Configuration of Wifi for Students


Widgets
Widgets<bs-widget-edit>
Contents
How to connect to Wi-Fi - Android Phone
Step 1 – Make sure Wi-Fi is switched on. Select “Student” Connection

Step 2 – Choose MSCHAPV2 in Phase 2 authentication and then enter your NetID and Password

Step 3 – After connecting, a pop-up message will appear. Click on that and enter your NetID and password in the Login Page to access Internet
(In case the pop-up message does not appear, please open the browser and enter the credentials when prompted)


How to connect to Wi-Fi – Apple/iOS Device
Step 1 - Go to Settings and select Wi-Fi. Turn it on as shown in screenshot below:
Step 2 - Select Student from the list of Networks available
Step 3 – Select the Student SSID. You will be prompted to enter the Username and Password. Please enter your NetID and Password and join
Step 4 - When you click Join, It will pop-up another window to Accept Certificate and Click on Trust as in following screenshot.
Step 5 - Once you Click Trust, You will be connected with Wi-Fi.
Step 6 – After join you have to open a browser (Safari) and again enter your NetID credentials for Internet access.
Configure Wi-Fi in Apple Mac Air book
Step 1 - Click the AirPort icon in the upper-right corner of the desktop. The AirPort icon looks like a series of circular waves. This displays a pull-down menu
Step – 2 Click "Turn AirPort on." If this option is not displayed, your MacBook's AirPort adapter is already enabled. While the AirPort adapter is on, the MacBook automatically scans periodically for broadcasts from nearby Wi-Fi access points. The pull-down menu displays the names of all access points discovered.
Step 3 - Click the name of the Wi-Fi access point that you want to join
Step 4 – A pop-up box appear enter your NetID credentials and join.
Step 5 – After join you have to open a browser (Safari) and again enter your NetID credentials for Internet access.
How to connect to Wi-Fi – PC, Windows 8/8.1
Step1: Bring your mouse pointer to extreme right of the screen, a side bar comes up,
Step2: Left click on the settings in the sidebar and then left click on Wi-Fi icon,
Step3: Left clicking on the Wi-Fi icon opens the list of available Wi-Fi networks, left click on “Student” from that list
Step4: Left click on connect button,
Step5: Left clicking on button “connect” will prompt you to enter login details,
Step6: Enter the provided Net Id and password and left click “OK”,
Step7: You will be asked for your windows password to proceed, please enter it and left click “OK”
Step8: Open any browser like chrome, IE, Mozilla etc. and type google.com in address bar and hit “Enter” key which will redirect you to a captive portal ,
Step9: Please enter your Net Id and password here again and left click on login button, this will bring up and Google.com page and start your internet.
Steps to connect Wi-Fi in Windows 10
Step 1 - Bring your mouse pointer to extreme right of the screen and click on Wi-Fi connection icon
Step 2 – Right click on that icon select the second option “Open Network and Sharing Center”
Step 3 – A new window will open than click on “Set up a new connection or network”
Step 4 – Select third option “Manually connect to a wireless network”
Step 5 – Enter the Network Name “Student”
Step 6 – Select the security type “WPA-2Enterprise” and click on Next
Step 7 – Click on “Change connection settings”
Step 8 – Select Second Tab “Security” of wireless network properties
Step 9 – Click on network authentication Method Settings
Step 10 – Uncheck “Verify the server’s identity by validating the certificate” and click OK
Step 11 – Than click on Advance Setting of wireless network properties
Step 12 – Check box of Specify authentication mode and select User Authentication than click on Save Credentials
Step 13 – In Save Credentials enter your provided NETID and password
Step 14 – Now right click on Wi-Fi icon and connect Student connection that will automatically open a browser.
Step 15 – Enter your NetID and password for access Internet
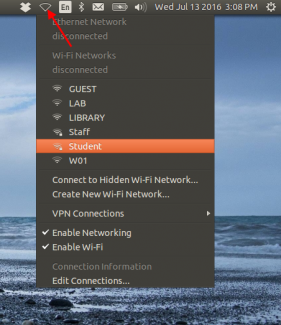
How to connect Wi-Fi in Ubuntu
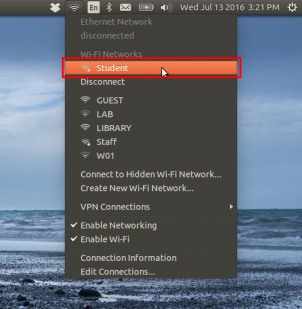
Step 1 - Click on Wi-Fi Icon on the top slide bar and select Student SSID as shown in screenshot.
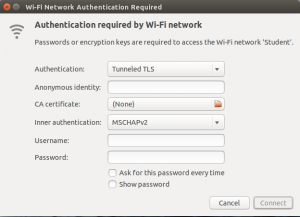
Now following screen will appear
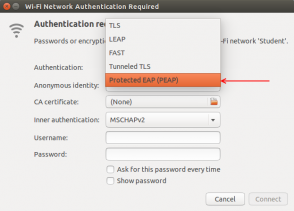
Step 2 - Now Set Authentication to Protected EAP (PEAP).
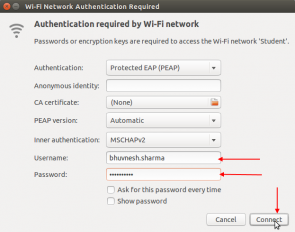
Step 3 - Now Enter Your NETID and password and Click on Connect as shown below:
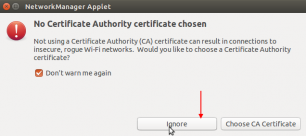
When you click on Connect, following pop-up screen will appear
Step 4 - Now Select “Don’t warn me again” check box and Click Ignore.
Now Click on Wi-Fi Icon again and check you are successfully connected with Student SSID.
.