Vinay Muskan (talk | contribs) |
Vinay Muskan (talk | contribs) |
||
| Line 41: | Line 41: | ||
'''Note:''' Turn off the Private DNS. | '''Note:''' Turn off the Private DNS. | ||
| + | |||
[[File:wifi android 2.1715937102490.jpg|left|frameless]] | [[File:wifi android 2.1715937102490.jpg|left|frameless]] | ||
| + | |||
| Line 63: | Line 65: | ||
[[File:wifi apple 1.1715937135643.png|left|frameless]] | [[File:wifi apple 1.1715937135643.png|left|frameless]] | ||
| + | |||
| Line 74: | Line 77: | ||
[[File:wifi apple 2.1715937157916.jpg|left|frameless]] | [[File:wifi apple 2.1715937157916.jpg|left|frameless]] | ||
| + | |||
| Line 82: | Line 86: | ||
Please enter your '''NetID and Password''' and click on '''join.''' | Please enter your '''NetID and Password''' and click on '''join.''' | ||
| + | |||
[[File:wifi apple 3.1715937187497.jpg|left|frameless]] | [[File:wifi apple 3.1715937187497.jpg|left|frameless]] | ||
| + | |||
| + | |||
| + | |||
| Line 95: | Line 103: | ||
[[File:wifi apple 4.1715937265978.jpg|left|frameless]] | [[File:wifi apple 4.1715937265978.jpg|left|frameless]] | ||
| + | |||
| Line 105: | Line 114: | ||
Click '''Trust''', you will be connected with Wi-Fi. | Click '''Trust''', you will be connected with Wi-Fi. | ||
| + | |||
[[File:wifi apple 5.1715937303478.jpg|left|frameless]] | [[File:wifi apple 5.1715937303478.jpg|left|frameless]] | ||
| Line 124: | Line 134: | ||
Step 3 - Click the name of the '''Student''' Wi-Fi access point | Step 3 - Click the name of the '''Student''' Wi-Fi access point | ||
| + | |||
[[File:wifi mac 1.1715937367339.jpg|left|frameless]] | [[File:wifi mac 1.1715937367339.jpg|left|frameless]] | ||
| Line 144: | Line 155: | ||
| + | Step 5 – Open the browser (Safari) and enter your NetID and password to get Internet access. | ||
| − | + | [[File:wifi mac 3.1715937436264.jpg|left|frameless]] | |
| − | |||
| Line 171: | Line 182: | ||
| − | Step 4 – Select third option '''“Manually connect to a wireless network”''' | + | Step 4 – Select third option '''“Manually connect to a wireless network”.''' |
[[File:network setting 2.1715937592253.jpg|left|frameless]] | [[File:network setting 2.1715937592253.jpg|left|frameless]] | ||
| + | |||
| Line 186: | Line 198: | ||
Step 6 – Select the security type '''“WPA-2Enterprise”''' and click on '''Next''' | Step 6 – Select the security type '''“WPA-2Enterprise”''' and click on '''Next''' | ||
| + | |||
[[File:network setting 3.1715937633886.jpg|left|frameless]] | [[File:network setting 3.1715937633886.jpg|left|frameless]] | ||
| + | |||
| Line 198: | Line 212: | ||
Step 7 – Click on '''“Change connection settings”''' | Step 7 – Click on '''“Change connection settings”''' | ||
| + | |||
| + | |||
[[File:network setting 4.1715937677322.jpg|left|frameless]] | [[File:network setting 4.1715937677322.jpg|left|frameless]] | ||
| + | |||
| Line 211: | Line 228: | ||
Step 9 – Click on network authentication Method Settings | Step 9 – Click on network authentication Method Settings | ||
| + | |||
[[File:network setting 5.1715937712682.jpg|left|frameless]] | [[File:network setting 5.1715937712682.jpg|left|frameless]] | ||
| Line 239: | Line 257: | ||
Step 12 – Click on Advance Setting of wireless network properties | Step 12 – Click on Advance Setting of wireless network properties | ||
| + | |||
[[File:network setting 7.1715937861767.png|left|frameless]] | [[File:network setting 7.1715937861767.png|left|frameless]] | ||
| Line 251: | Line 270: | ||
Step 13 – Check the box – '''“Specify authentication mode”''' and select User Authentication. Click on '''Save Credentials''' | Step 13 – Check the box – '''“Specify authentication mode”''' and select User Authentication. Click on '''Save Credentials''' | ||
| + | |||
[[File:network setting 8.1715937901422.jpg|left|frameless]] | [[File:network setting 8.1715937901422.jpg|left|frameless]] | ||
| Line 263: | Line 283: | ||
| − | Step 14 – In the Save Credentials window, enter your '''NETID''' and '''password''' | + | Step 14 – In the Save Credentials window, enter your '''NETID''' and '''password.''' |
[[File:network setting 9.1715937931084.jpg|left|frameless]] | [[File:network setting 9.1715937931084.jpg|left|frameless]] | ||
| Line 275: | Line 295: | ||
| − | Step 15 – Right click on Wi-Fi icon and connect to Student connection | + | Step 15 – Right click on Wi-Fi icon and connect to Student connection. |
| + | |||
[[File:wifi laptop setting 1.1715938005751.jpg|left|frameless]] | [[File:wifi laptop setting 1.1715938005751.jpg|left|frameless]] | ||
| + | |||
| + | |||
| + | |||
| Line 299: | Line 323: | ||
(In case the browser window does not pop-up, you can open if manually) | (In case the browser window does not pop-up, you can open if manually) | ||
| + | |||
[[File:wifi laptop setting 2.1715938038846.jpg|left|frameless]] | [[File:wifi laptop setting 2.1715938038846.jpg|left|frameless]] | ||
| Line 310: | Line 335: | ||
= How to connect Wi-Fi in Ubuntu = | = How to connect Wi-Fi in Ubuntu = | ||
Step 1 - Click on Wi-Fi Icon on the top slide bar and select '''Student''' connection. | Step 1 - Click on Wi-Fi Icon on the top slide bar and select '''Student''' connection. | ||
| + | |||
[[File:wifi ubuntu laptop setting 1.1715938123767.png|left|frameless]] | [[File:wifi ubuntu laptop setting 1.1715938123767.png|left|frameless]] | ||
| + | |||
| + | |||
| + | |||
| Line 347: | Line 376: | ||
| − | Step 3 - Enter Your NETID and password and Click on '''Connect''' | + | Step 3 - Enter Your NETID and password and Click on '''Connect.''' |
| + | |||
[[File:wifi ubuntu laptop setting 4.1715938221436.png|left|frameless]] | [[File:wifi ubuntu laptop setting 4.1715938221436.png|left|frameless]] | ||
| Line 359: | Line 389: | ||
Step 4 - The following pop-up screen will appear. Select '''“Don’t warn me again”''' check box and Click '''Ignore'''. | Step 4 - The following pop-up screen will appear. Select '''“Don’t warn me again”''' check box and Click '''Ignore'''. | ||
| + | |||
[[File:wifi ubuntu laptop setting 5.1715938252811.png|left|frameless]] | [[File:wifi ubuntu laptop setting 5.1715938252811.png|left|frameless]] | ||
| + | |||
| Line 369: | Line 401: | ||
Now Click on Wi-Fi Icon to check whether you have successfully connected to the '''Student''' connection. | Now Click on Wi-Fi Icon to check whether you have successfully connected to the '''Student''' connection. | ||
| + | |||
[[File:wifi ubuntu laptop setting 6.1715938290528.png|left|frameless]] | [[File:wifi ubuntu laptop setting 6.1715938290528.png|left|frameless]] | ||
Revision as of 04:45, 20 May 2024
How to connect to Wi-Fi - Android Phone
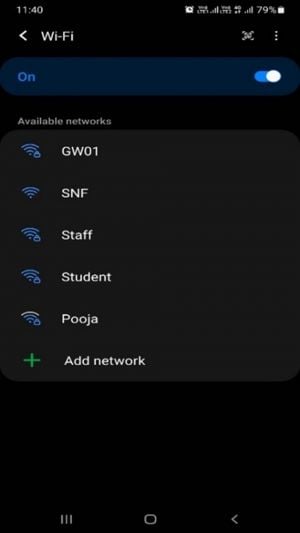
Step 1 – Make sure Wi-Fi is switched on. Select “Student” SSID.
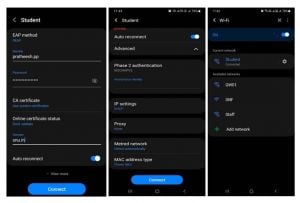
Step 2 – Enter the following information and Click on Connect.
EAP method: PEAP
Phase 2 authentication: MSCHAPV2
CA certificate: Use system certificates
Online certificate status: Don’t validate.
Domain: snu.in
Identity: Your Net ID username (e.g.: ab123)
Password: Your Net ID password
MAC address type: Phone Mac
Note: Turn off the Private DNS.
Your mobile device is now connected to Student Network.
Below link for detailed setup instructions
https://wiki.snu.edu.in/index.php/Wifi
How to connect to Wi-Fi – Apple/iOS Device
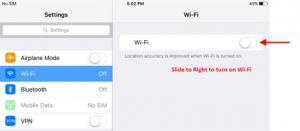
Step 1 - Go to Settings and select Wi-Fi. Turn it on as shown in screenshot below:
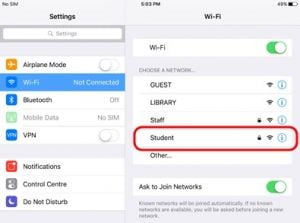
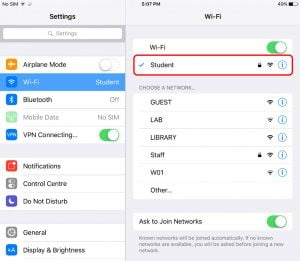
Step 2 - Select Student from the list of Networks available
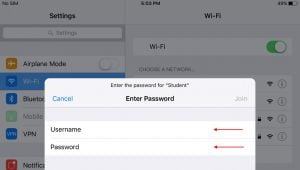
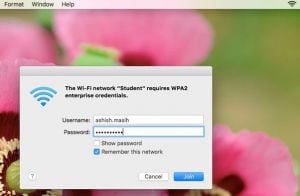
Step 3 – Select the Student Network. You will be prompted to enter the Username and Password.
Please enter your NetID and Password and click on join.
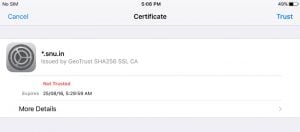
Step 4 - Click on Join. Pop-up window will appear. Click on Trust to Accept the Certificate.
Step 5 - Once you
Click Trust, you will be connected with Wi-Fi.
Step 6 – Open the browser (Safari) and enter your NetID and Password to get Internet access.
How to connect to Wi-Fi – Apple Macbook
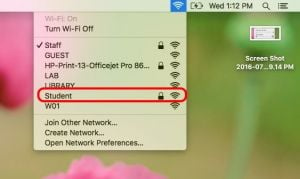
Step 1 - Click the AirPort icon in the upper-right corner of the desktop. The AirPort icon looks like a series of circular waves. This will display a pull-down menu
Step – 2 Click "Turn AirPort on." If this option is not displayed, your MacBook's AirPort adapter is already enabled. While the AirPort adapter is on, the MacBook automatically scans periodically for broadcasts from nearby Wi-Fi access points. The pull-down menu displays the names of all access points discovered.
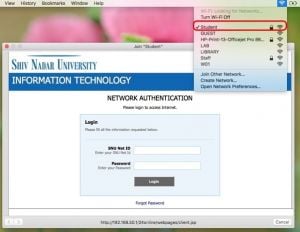
Step 3 - Click the name of the Student Wi-Fi access point
Step 4 – A pop-up box will appear. Enter your NetID credentials and click on join.
Step 5 – Open the browser (Safari) and enter your NetID and password to get Internet access.
Steps to connect Wi-Fi in Windows 7/8/8.1/10
Step 1 - Bring your mouse pointer to extreme right of the screen and click on Wi-Fi connection icon
Step 2 – Right click on that icon select the second option “Open Network and Sharing Center”
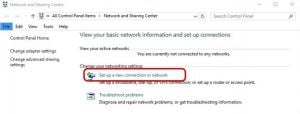
Step 3 – A new window will open. Click on “Set up a new connection or network”
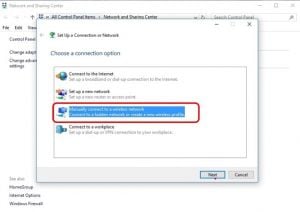
Step 4 – Select third option “Manually connect to a wireless network”.
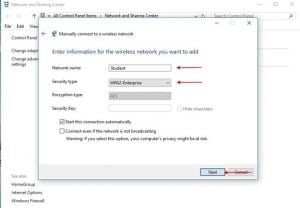
Step 5 – Enter the Network Name “Student”
Step 6 – Select the security type “WPA-2Enterprise” and click on Next
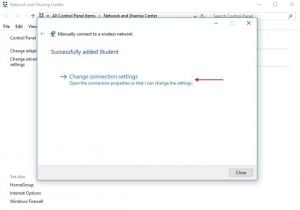
Step 7 – Click on “Change connection settings”
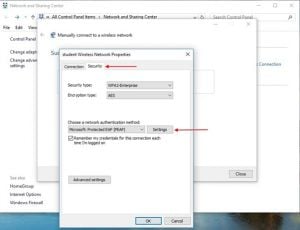
Step 8 – Select Second Tab “Security” of wireless network properties
Step 9 – Click on network authentication Method Settings
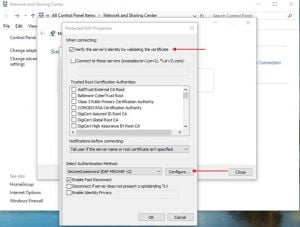
Step 10 – Uncheck “Verify the server’s identity by validating the certificate” and click on "configure of Select Authentication Method"
Step 11 – Uncheck “Automatically use my windows logon name and password” and click OK
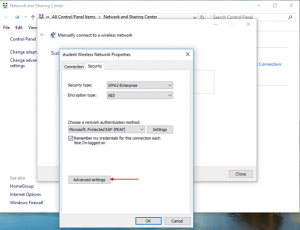
Step 12 – Click on Advance Setting of wireless network properties
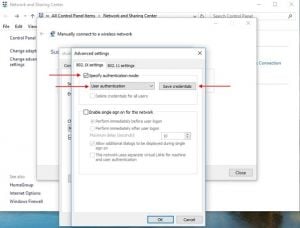
Step 13 – Check the box – “Specify authentication mode” and select User Authentication. Click on Save Credentials
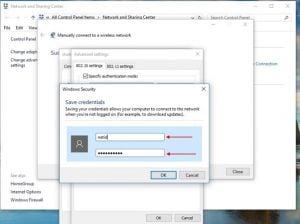
Step 14 – In the Save Credentials window, enter your NETID and password.
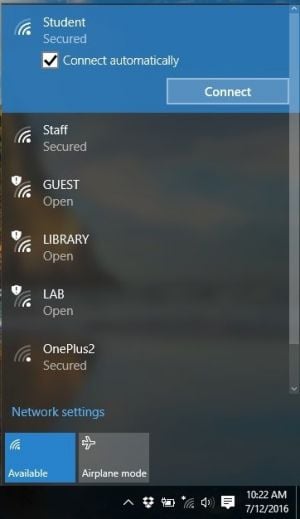
Step 15 – Right click on Wi-Fi icon and connect to Student connection.
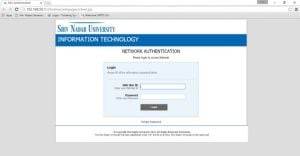
Step 16 – The browser window will automatically open. Enter your NetID and password to get Internet access
(In case the browser window does not pop-up, you can open if manually)
How to connect Wi-Fi in Ubuntu
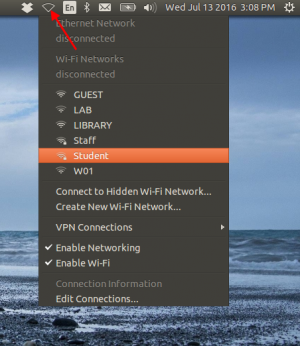
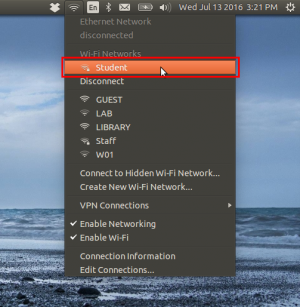
Step 1 - Click on Wi-Fi Icon on the top slide bar and select Student connection.
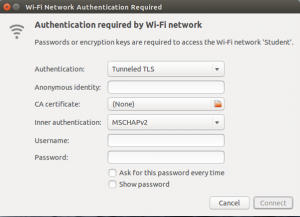
Following screen will appear
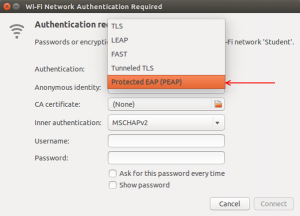
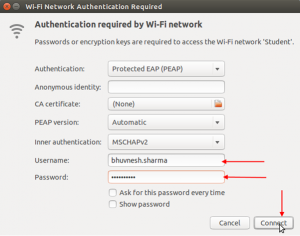
Step 2 - Set Authentication to Protected EAP (PEAP).
Step 3 - Enter Your NETID and password and Click on Connect.
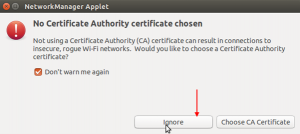
Step 4 - The following pop-up screen will appear. Select “Don’t warn me again” check box and Click Ignore.
Now Click on Wi-Fi Icon to check whether you have successfully connected to the Student connection.
Step 5 – Open the browser window and enter your NetID and password to get Internet access
.
