Vinay Muskan (talk | contribs) (Created page with "1. Enter the University email ID in the Google Sign-In page by using a web browser (Google Chrome, Mozilla Firefox, Microsoft Edge, Safari). Click '''“Next,”''' as shown b...") |
Vinay Muskan (talk | contribs) |
||
| (8 intermediate revisions by the same user not shown) | |||
| Line 1: | Line 1: | ||
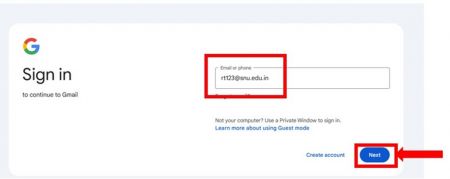
1. Enter the University email ID in the Google Sign-In page by using a web browser (Google Chrome, Mozilla Firefox, Microsoft Edge, Safari). Click '''“Next,”''' as shown below: | 1. Enter the University email ID in the Google Sign-In page by using a web browser (Google Chrome, Mozilla Firefox, Microsoft Edge, Safari). Click '''“Next,”''' as shown below: | ||
| + | [[File:Picture1.1716958239813.jpg|left|frameless|450x450px]] | ||
| + | |||
| + | |||
| + | |||
| + | |||
| + | |||
| + | |||
| + | |||
| + | |||
| + | |||
| + | |||
| + | |||
| + | |||
| − | |||
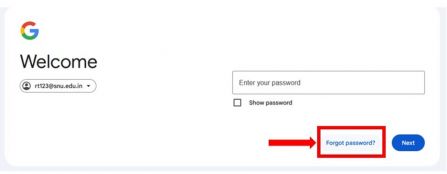
2. Click on '''“Forgot Password”.''' | 2. Click on '''“Forgot Password”.''' | ||
| + | [[File:Picture2.1716958296207.jpg|left|frameless|447x447px]] | ||
| + | |||
| + | |||
| + | |||
| + | |||
| + | |||
| + | |||
| + | |||
| + | |||
| + | |||
| + | |||
| + | |||
| − | |||
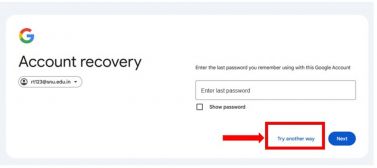
3. Click on '''“Try Another way”.''' | 3. Click on '''“Try Another way”.''' | ||
| + | [[File:Picture3.1716958341596.jpg|left|frameless|377x377px]] | ||
| + | |||
| + | |||
| + | |||
| + | |||
| + | |||
| + | |||
| + | |||
| + | |||
| + | |||
| + | |||
| − | |||
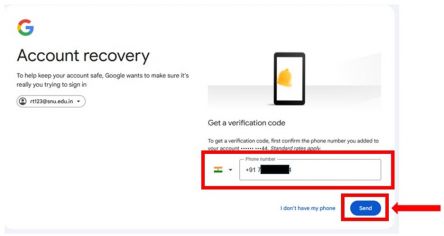
4. On the next screen, select the country and enter the pre-registered recovery phone number that was set up in Part 1 of this guide. Click on '''“Send”''' button. | 4. On the next screen, select the country and enter the pre-registered recovery phone number that was set up in Part 1 of this guide. Click on '''“Send”''' button. | ||
| − | + | [[File:Picture4.1716958465595.jpg|left|frameless|444x444px]] | |
| + | |||
| + | |||
| + | |||
| + | |||
| + | |||
| + | |||
| + | |||
| + | |||
| + | |||
| + | |||
| + | |||
| + | |||
| + | |||
| + | |||
| + | |||
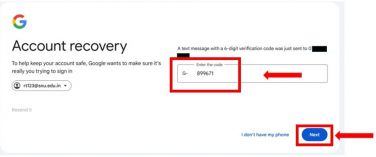
5. Enter the code received on your phone & click on '''“Next”.''' | 5. Enter the code received on your phone & click on '''“Next”.''' | ||
| + | [[File:Picture5.1716958506341.jpg|left|frameless|376x376px]] | ||
| + | |||
| + | |||
| + | |||
| + | |||
| + | |||
| + | |||
| + | |||
| + | |||
| + | |||
| + | |||
| + | |||
| − | |||
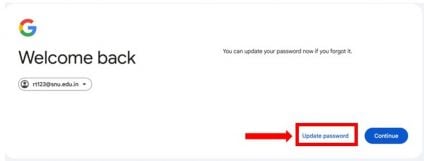
6. After authentication on the next screen, click on '''“Update Password”.''' | 6. After authentication on the next screen, click on '''“Update Password”.''' | ||
| + | [[File:Picture6.1716958549109.jpg|left|frameless|424x424px]] | ||
| + | |||
| + | |||
| + | |||
| + | |||
| + | |||
| + | |||
| + | |||
| + | |||
| + | |||
| + | |||
| + | |||
| − | |||
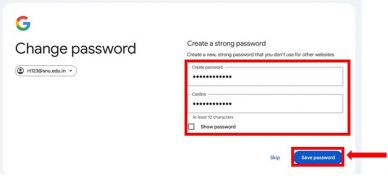
7. On the next screen, change the password by creating a new password and click on '''“Save Password”.''' | 7. On the next screen, change the password by creating a new password and click on '''“Save Password”.''' | ||
| + | [[File:Picture7.1716958597017.jpg|left|frameless|388x388px]] | ||
| + | |||
| + | |||
| + | |||
| + | |||
| + | |||
| + | |||
| + | |||
| + | |||
| + | |||
| + | |||
| + | |||
| + | |||
| − | |||
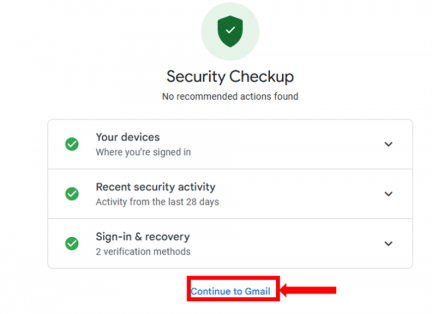
8. Click on '''“Continue to Gmail”''' after the password setup. | 8. Click on '''“Continue to Gmail”''' after the password setup. | ||
| + | [[File:Picture8.1716958635387.png|left|frameless|432x432px]] | ||
| + | |||
| + | |||
| + | |||
| + | |||
| + | |||
| + | |||
| + | |||
| + | |||
| + | |||
| + | |||
| + | |||
| − | |||
<span style="color: rgb(51, 102, 255);" data-mce-style="color: #3366ff;">(In case, any issue is faced, please write to ithelpdesk@snu.edu.in )</span> | <span style="color: rgb(51, 102, 255);" data-mce-style="color: #3366ff;">(In case, any issue is faced, please write to ithelpdesk@snu.edu.in )</span> | ||
Latest revision as of 05:01, 29 May 2024
1. Enter the University email ID in the Google Sign-In page by using a web browser (Google Chrome, Mozilla Firefox, Microsoft Edge, Safari). Click “Next,” as shown below:
2. Click on “Forgot Password”.
3. Click on “Try Another way”.
4. On the next screen, select the country and enter the pre-registered recovery phone number that was set up in Part 1 of this guide. Click on “Send” button.
5. Enter the code received on your phone & click on “Next”.
6. After authentication on the next screen, click on “Update Password”.
7. On the next screen, change the password by creating a new password and click on “Save Password”.
8. Click on “Continue to Gmail” after the password setup.
(In case, any issue is faced, please write to ithelpdesk@snu.edu.in )
