Difference between revisions of "VPN Configuration"


Widgets
Widgets<bs-widget-edit>
Ankit.sharma (Talk | contribs) (Created page with "=Steps for Setting up the VPN= ==Step1:== Download the setup from the link [http://helpdesk.webapps.snu.edu.in/JunosPulse_Mac.dmg http://helpdesk.webapps.snu.edu.in/JunosPuls...") |
Ankit.sharma (Talk | contribs) (→Step1: Downloading the Setup File) |
||
| (32 intermediate revisions by the same user not shown) | |||
| Line 1: | Line 1: | ||
| − | =Steps for Setting up the VPN= | + | =Steps for Setting up the VPN -- MAC OS X= |
| − | ==Step1:== | + | ==Step1: Downloading the Setup File== |
Download the setup from the link | Download the setup from the link | ||
[http://helpdesk.webapps.snu.edu.in/JunosPulse_Mac.dmg http://helpdesk.webapps.snu.edu.in/JunosPulse_Mac.dmg] | [http://helpdesk.webapps.snu.edu.in/JunosPulse_Mac.dmg http://helpdesk.webapps.snu.edu.in/JunosPulse_Mac.dmg] | ||
| − | ==Step2:== | + | ==Step2: Extracting the Setup.== |
Double Click on the Downloaded file to extract it. | Double Click on the Downloaded file to extract it. | ||
[[File:img1.PNG|none]] | [[File:img1.PNG|none]] | ||
| − | + | ==Step3: Begin the Installation== | |
| − | + | ||
| − | ==Step3:== | + | |
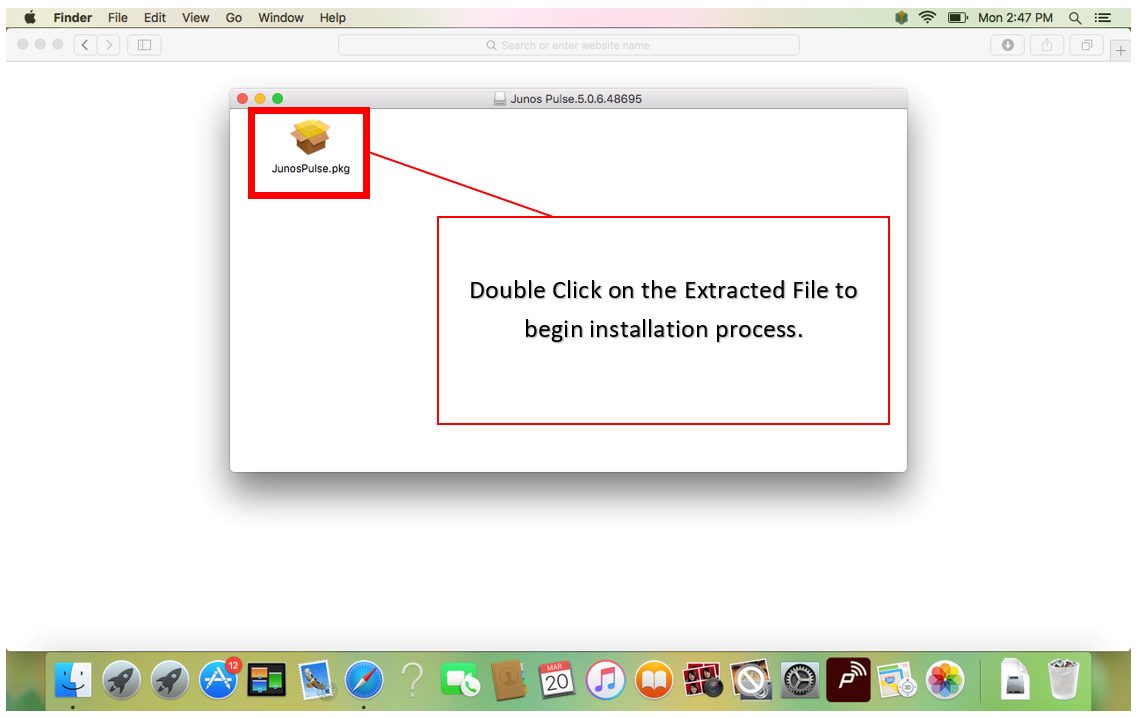
Double Click on the Extracted file that is open in a new window. | Double Click on the Extracted file that is open in a new window. | ||
| − | [[File:img2.PNG|link=|nolink | + | [[File:img2.PNG|none|link=|nolink]] |
| − | + | ||
| − | + | ==Step4: Installation== | |
| − | + | ||
| − | + | ||
| − | + | ||
| − | + | ||
| − | + | ||
| − | + | ||
| − | + | ||
| − | + | ||
| − | ==Step4:== | + | |
Click on Continue button. | Click on Continue button. | ||
[[File:img3.PNG|none|link=|nolink]] | [[File:img3.PNG|none|link=|nolink]] | ||
| − | ==Step5:== | + | ==Step5: Installation Contd...== |
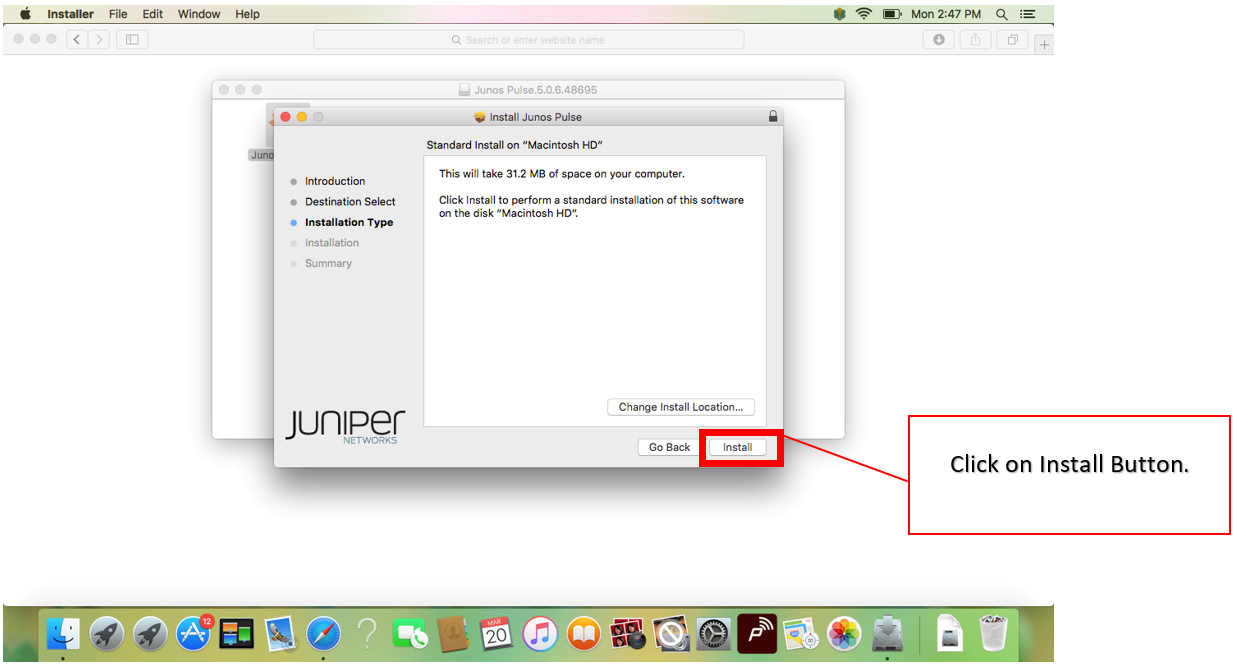
Click on Install button. | Click on Install button. | ||
| + | [[File:img4.PNG|none|link=|nolink]] | ||
| − | + | ==Step6: Installation Contd...== | |
| − | ==Step6:== | + | |
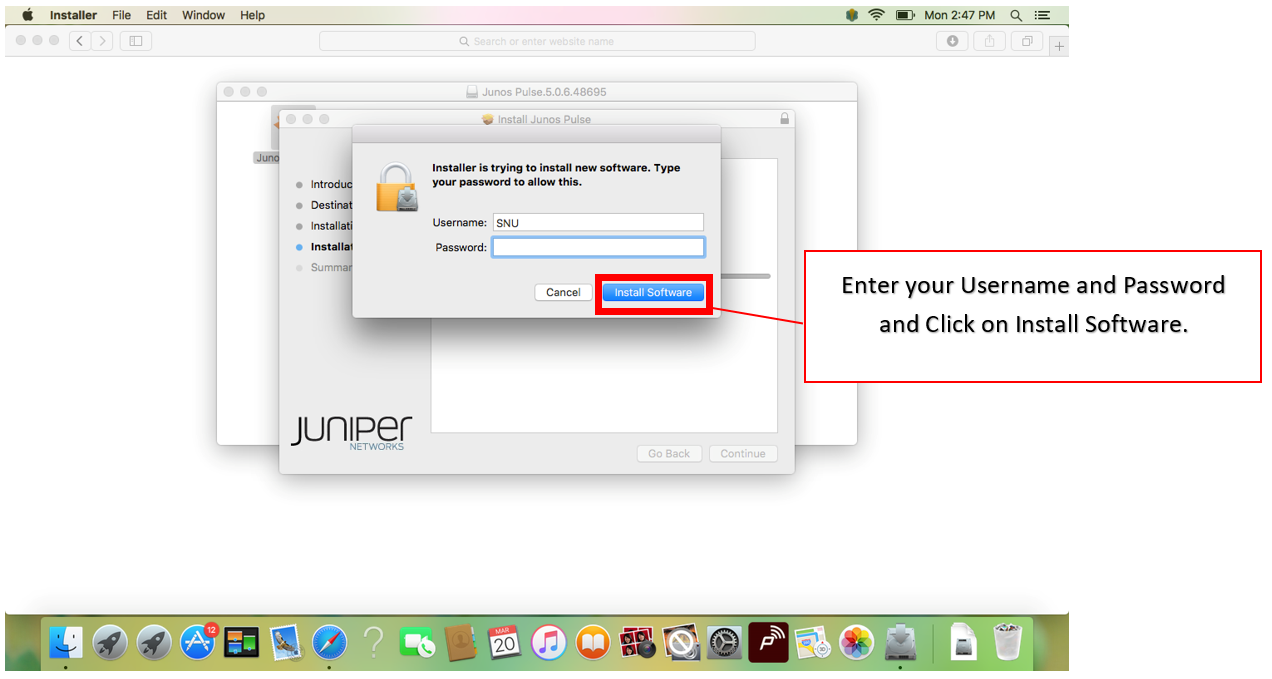
Enter your Username and Password and click on Install Software Button. | Enter your Username and Password and click on Install Software Button. | ||
| + | [[File:img5.PNG|none|link=|nolink]] | ||
| − | + | ==Step7: Installation Success== | |
| − | + | ||
| − | ==Step7:== | + | |
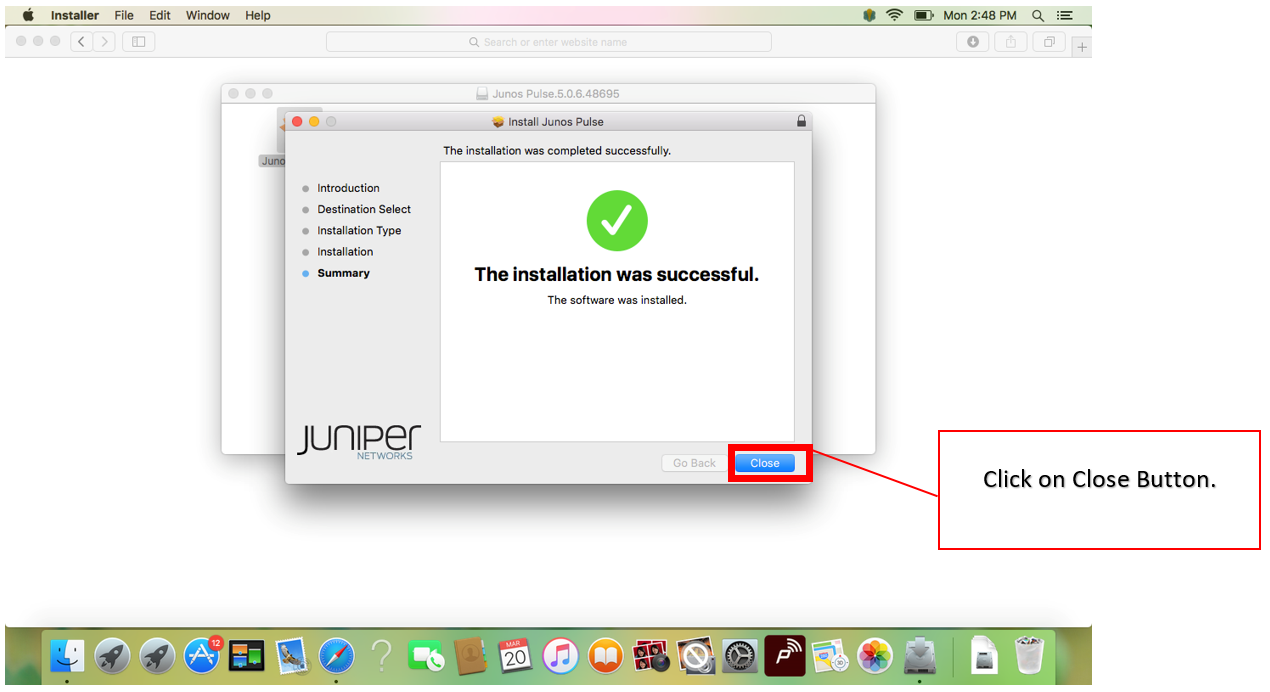
Click on Close Button. | Click on Close Button. | ||
| − | ==Step8:== | + | [[File:img6.PNG|none|link=|nolink]] |
| + | |||
| + | ==Step8: Launch the App "Junos Pulse"== | ||
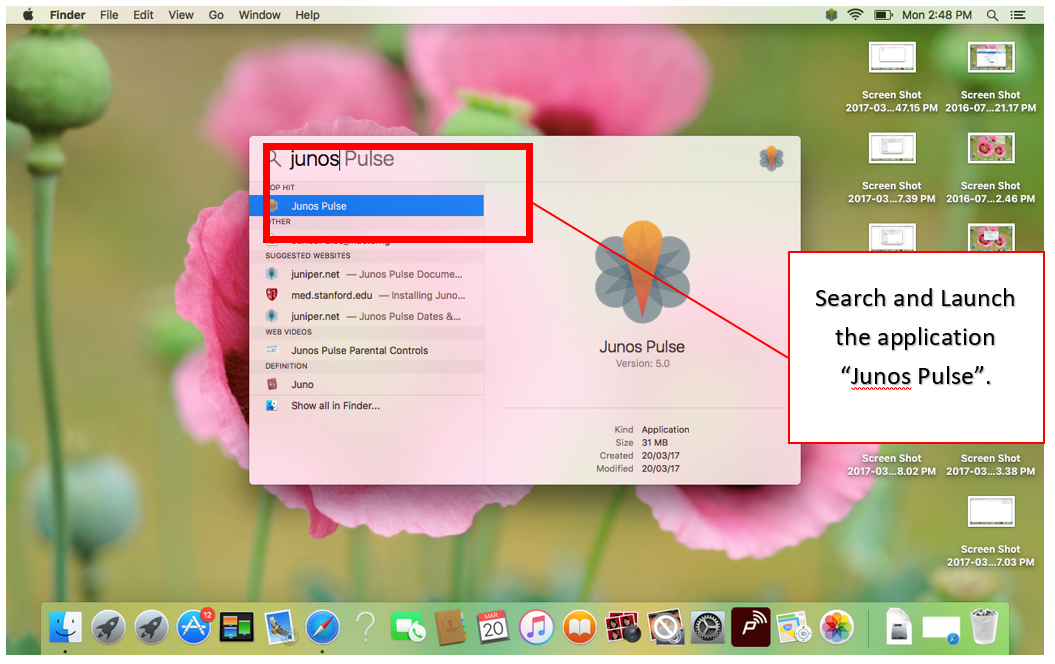
Search for the Application “Junos Pulse” and launch it from the list. | Search for the Application “Junos Pulse” and launch it from the list. | ||
| − | ==Step9:== | + | [[File:img7.PNG|none|link=|nolink]] |
| + | |||
| + | ==Step9: Adding a New Connection== | ||
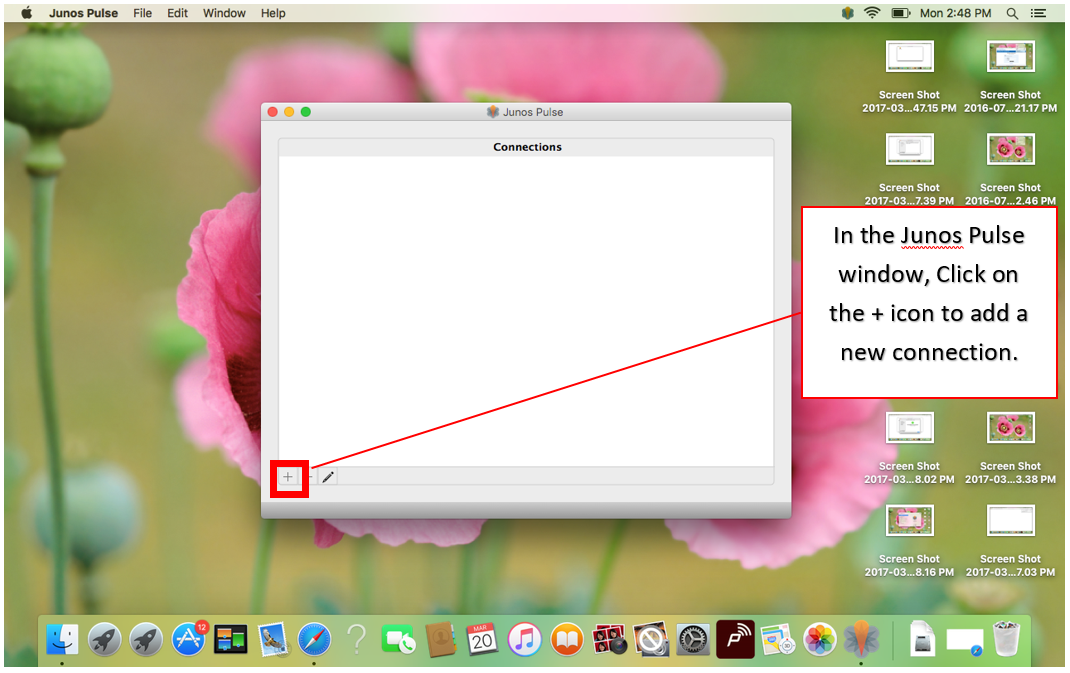
In the Window Below, Click on the + Icon to add a new connection. | In the Window Below, Click on the + Icon to add a new connection. | ||
| − | ==Step10:== | + | [[File:img8.PNG|none|link=|nolink]] |
| + | |||
| + | ==Step10: Adding a New Connection Contd...== | ||
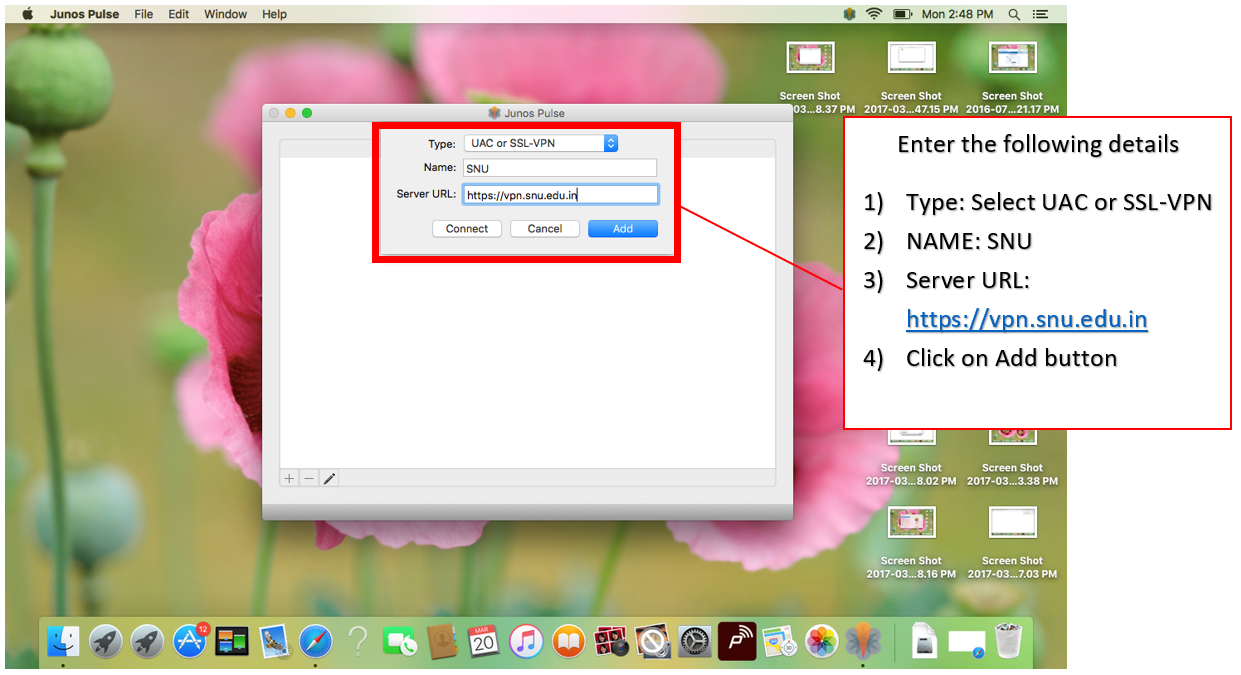
In the Window Below, add the following details. | In the Window Below, add the following details. | ||
| − | ==Step11:== | + | [[File:img9.PNG|none|link=|nolink]] |
| + | |||
| + | ==Step11: Establishing VPN Connection== | ||
In the Window Below, you will see the newly added connection. Click on Connect. | In the Window Below, you will see the newly added connection. Click on Connect. | ||
| − | ==Step12:== | + | [[File:img10.PNG|none|link=|nolink]] |
| + | |||
| + | ==Step12: Selecting Realms== | ||
In the Window Below, select the Realms “SNU-RODC”. Click on Connect. | In the Window Below, select the Realms “SNU-RODC”. Click on Connect. | ||
| − | == | + | [[File:img11.PNG|none|link=|nolink]] |
| + | |||
| + | ==Step13: Disconnecting your Session.== | ||
In the Window Below, Enter your VPN User Name and Password. Click on Connect. | In the Window Below, Enter your VPN User Name and Password. Click on Connect. | ||
| + | |||
| + | [[File:img13.PNG|none|link=|nolink]] | ||
| Line 68: | Line 69: | ||
* You are now connected to the SNU VPN. | * You are now connected to the SNU VPN. | ||
* To '''disconnect''' your session, click on '''Disconnect Button'''. | * To '''disconnect''' your session, click on '''Disconnect Button'''. | ||
| + | |||
| + | |||
| + | =Steps for Setting up the VPN -- WINDOWS OS= | ||
| + | ==Step1: Downloading the Setup File== | ||
| + | Download the setup from the link | ||
| + | |||
| + | http://helpdesk.webapps.snu.edu.in/Pulse-Secure_Windows_64bit.msi | ||
| + | |||
| + | ==Step2: Run the Setup.== | ||
| + | Double Click on the Downloaded file to run it. | ||
| + | |||
| + | |||
| + | |||
| + | ==Step3: Install Pulse Secure Software.== | ||
| + | Click on Next Button. | ||
| + | |||
| + | [[File:VPN_Win1.PNG|none|link=|nolink]] | ||
| + | |||
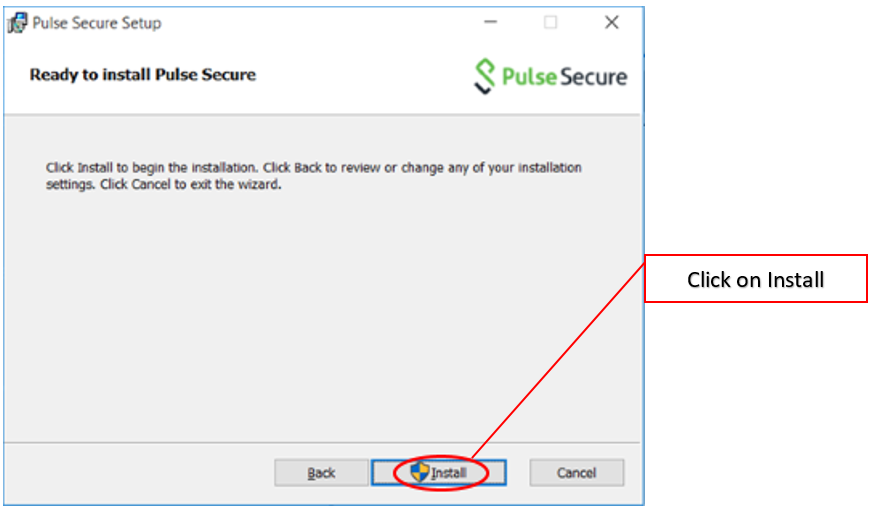
| + | ==Step4: Install Pulse Secure Software Contd...== | ||
| + | Click on the Install Button. | ||
| + | |||
| + | [[File:VPN_Win2.PNG|none|link=|nolink]] | ||
| + | |||
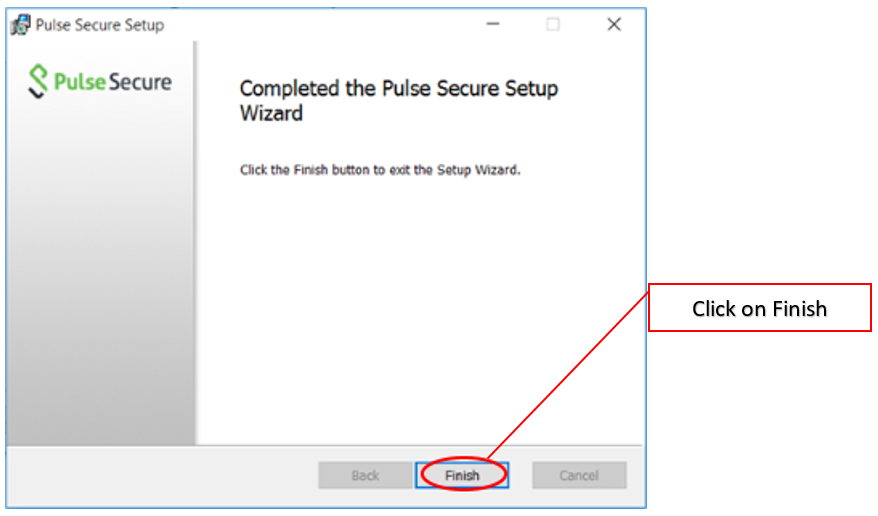
| + | ==Step5: Install Pulse Secure Software Contd...== | ||
| + | Click on Finish Button to finish the installation. | ||
| + | |||
| + | |||
| + | [[File:VPN_Win3.PNG|none|link=|nolink]] | ||
| + | |||
| + | |||
| + | |||
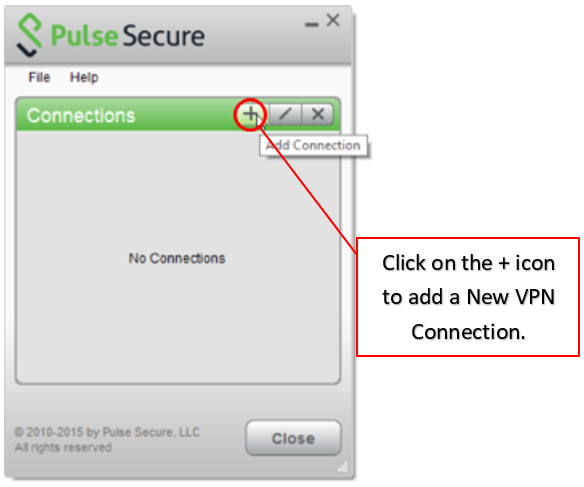
| + | ==Step6: Launch the Application and Add Connection.== | ||
| + | 1. Launch the application from Start Menu or the Desktop Icon. | ||
| + | |||
| + | 2. Click on the + icon to add the connection. | ||
| + | |||
| + | [[File:VPN_Win4.PNG|none|link=|nolink]] | ||
| + | |||
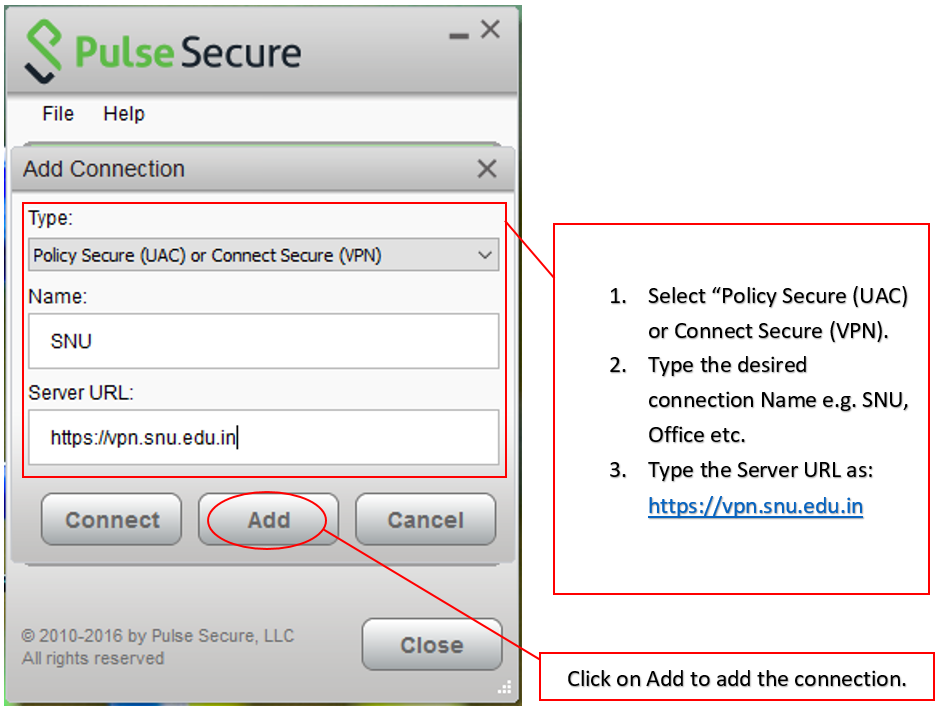
| + | ==Step7: Adding a New Connection Contd...== | ||
| + | # Select “Policy Secure (UAC) or Connect Secure (VPN)." | ||
| + | # Type the desired connection Name e.g. SNU, Office etc. | ||
| + | # Type the Server URL as: [https://vpn.snu.edu.in https://vpn.snu.edu.in] | ||
| + | # Click on Add Button. | ||
| + | |||
| + | [[File:VPN_Win5.PNG|none|link=|nolink]] | ||
| + | |||
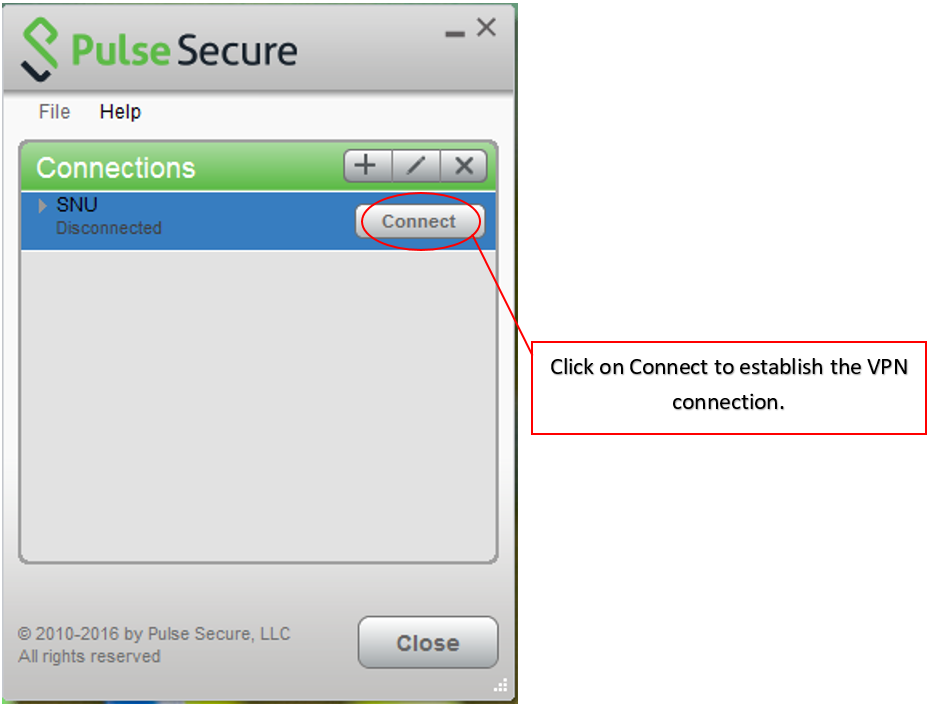
| + | ==Step8: Establishing the VPN Connection== | ||
| + | Click on Connect Button. | ||
| + | |||
| + | [[File:VPN_Win6.PNG|none|link=|nolink]] | ||
| + | |||
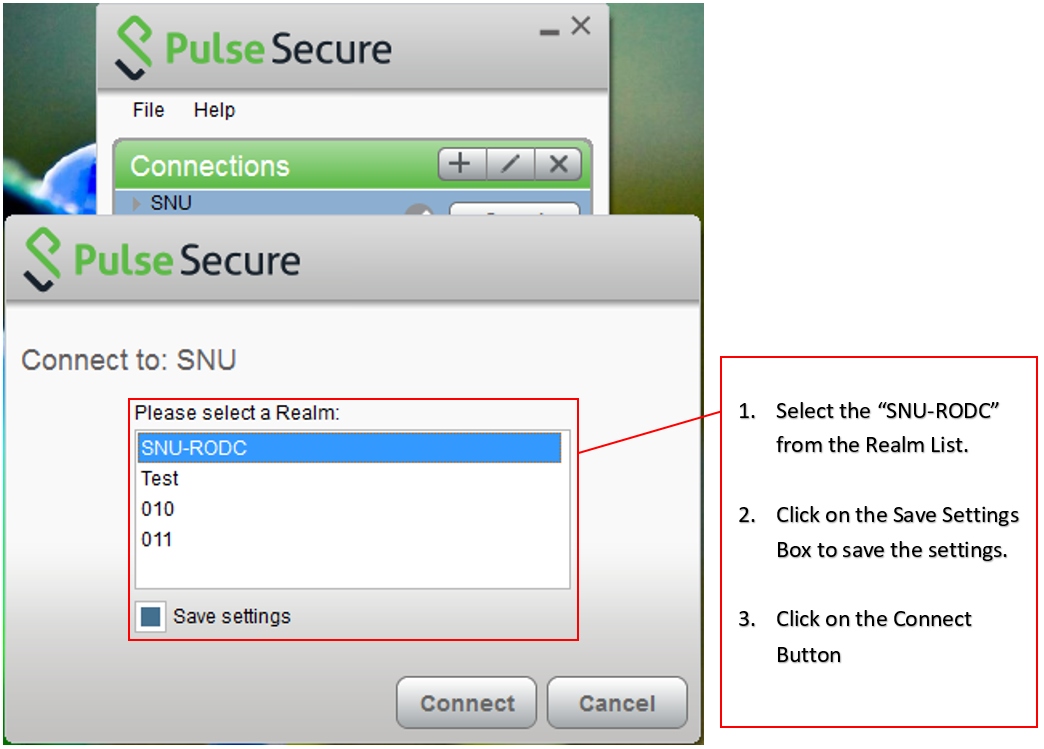
| + | ==Step9: Establishing the VPN Connection Contd...== | ||
| + | # Select the “SNU-RODC” from the Realm List. | ||
| + | |||
| + | # Click on the Save Settings Box to save the settings. | ||
| + | |||
| + | # Click on the Connect Button | ||
| + | |||
| + | [[File:VPN_Win7.PNG|none|link=|nolink]] | ||
| + | |||
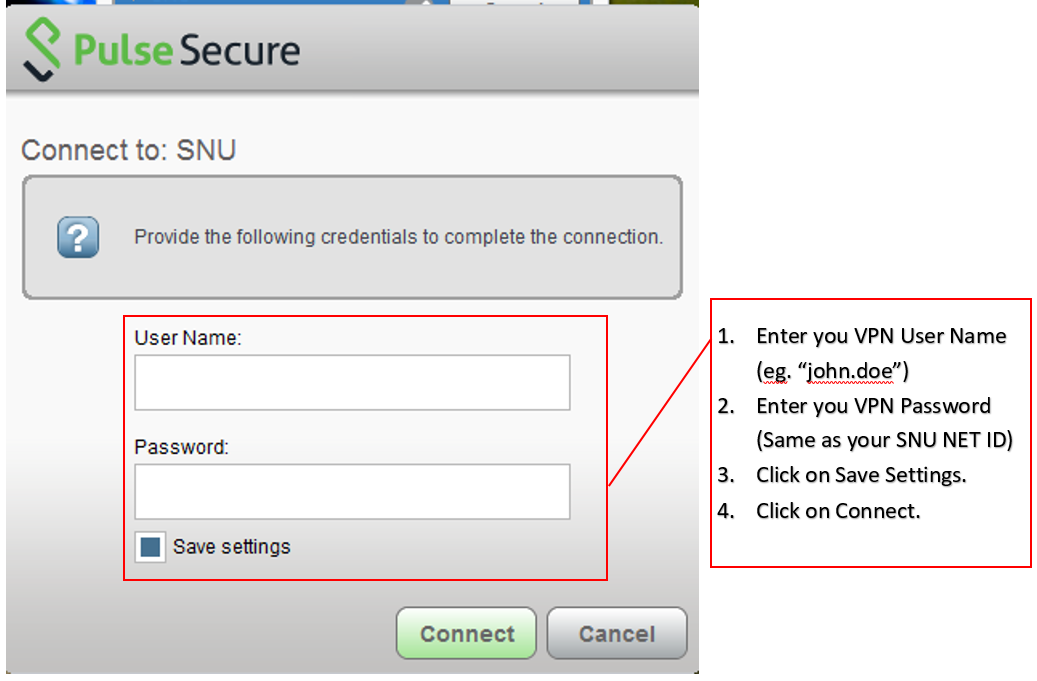
| + | ==Step10: Enter your VPN Credentials== | ||
| + | # Enter you VPN User Name (eg. “john.doe”) | ||
| + | # Enter you VPN Password (Same as your SNU NET ID) | ||
| + | # Click on Save Settings. | ||
| + | # Click on Connect. | ||
| + | |||
| + | [[File:VPN_Win9.PNG|none|link=|nolink]] | ||
| + | |||
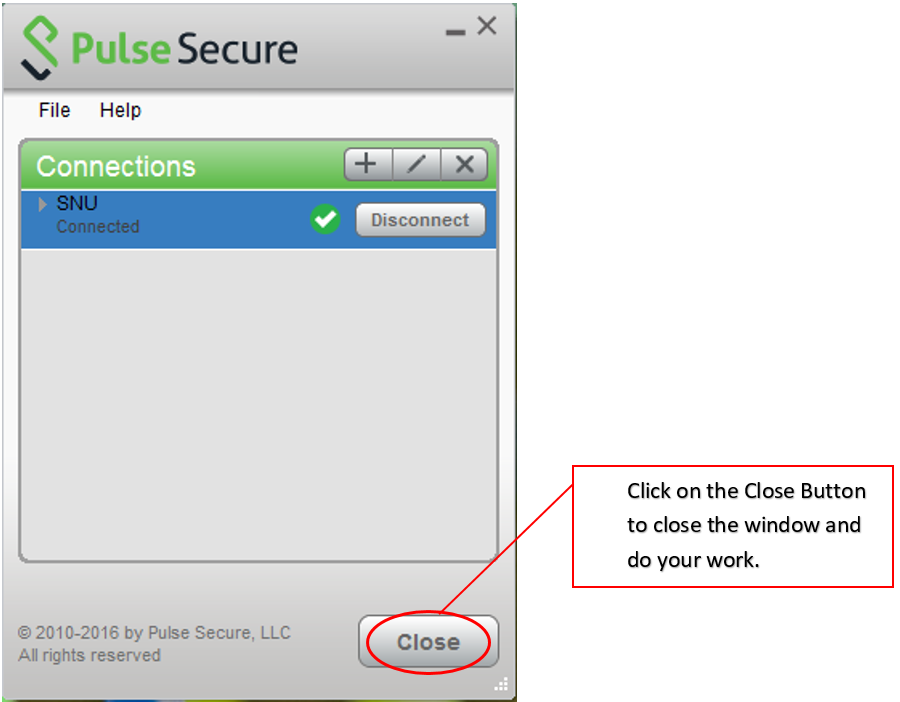
| + | ==Step11: Close the connection window== | ||
| + | Click on the Close Button to Close the window and do your work. | ||
| + | |||
| + | [[File:VPN_Win8.PNG|link=|nolink|none]] | ||
| + | |||
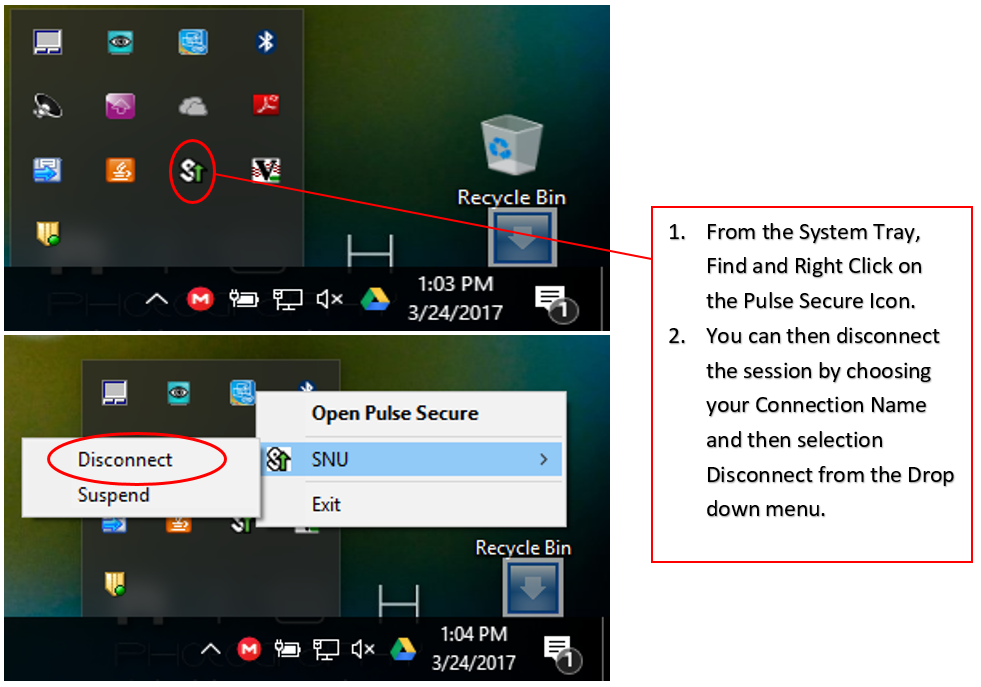
| + | ==Step12: Disconnecting the Session== | ||
| + | # From the System Tray, Find and Right Click on the Pulse Secure Icon. | ||
| + | # You can then disconnect the session by choosing your Connection Name and then selection Disconnect from the Drop down menu. | ||
| + | |||
| + | [[File:VPN_Win10.PNG|none|link=|nolink]] | ||
Latest revision as of 05:21, 25 March 2017
Contents
- 1 Steps for Setting up the VPN -- MAC OS X
- 1.1 Step1: Downloading the Setup File
- 1.2 Step2: Extracting the Setup.
- 1.3 Step3: Begin the Installation
- 1.4 Step4: Installation
- 1.5 Step5: Installation Contd...
- 1.6 Step6: Installation Contd...
- 1.7 Step7: Installation Success
- 1.8 Step8: Launch the App "Junos Pulse"
- 1.9 Step9: Adding a New Connection
- 1.10 Step10: Adding a New Connection Contd...
- 1.11 Step11: Establishing VPN Connection
- 1.12 Step12: Selecting Realms
- 1.13 Step13: Disconnecting your Session.
- 2 Steps for Setting up the VPN -- WINDOWS OS
- 2.1 Step1: Downloading the Setup File
- 2.2 Step2: Run the Setup.
- 2.3 Step3: Install Pulse Secure Software.
- 2.4 Step4: Install Pulse Secure Software Contd...
- 2.5 Step5: Install Pulse Secure Software Contd...
- 2.6 Step6: Launch the Application and Add Connection.
- 2.7 Step7: Adding a New Connection Contd...
- 2.8 Step8: Establishing the VPN Connection
- 2.9 Step9: Establishing the VPN Connection Contd...
- 2.10 Step10: Enter your VPN Credentials
- 2.11 Step11: Close the connection window
- 2.12 Step12: Disconnecting the Session
Steps for Setting up the VPN -- MAC OS X
Step1: Downloading the Setup File
Download the setup from the link
http://helpdesk.webapps.snu.edu.in/JunosPulse_Mac.dmg
Step2: Extracting the Setup.
Double Click on the Downloaded file to extract it.

Step3: Begin the Installation
Double Click on the Extracted file that is open in a new window.
Step4: Installation
Click on Continue button.

Step5: Installation Contd...
Click on Install button.
Step6: Installation Contd...
Enter your Username and Password and click on Install Software Button.
Step7: Installation Success
Click on Close Button.
Step8: Launch the App "Junos Pulse"
Search for the Application “Junos Pulse” and launch it from the list.
Step9: Adding a New Connection
In the Window Below, Click on the + Icon to add a new connection.
Step10: Adding a New Connection Contd...
In the Window Below, add the following details.
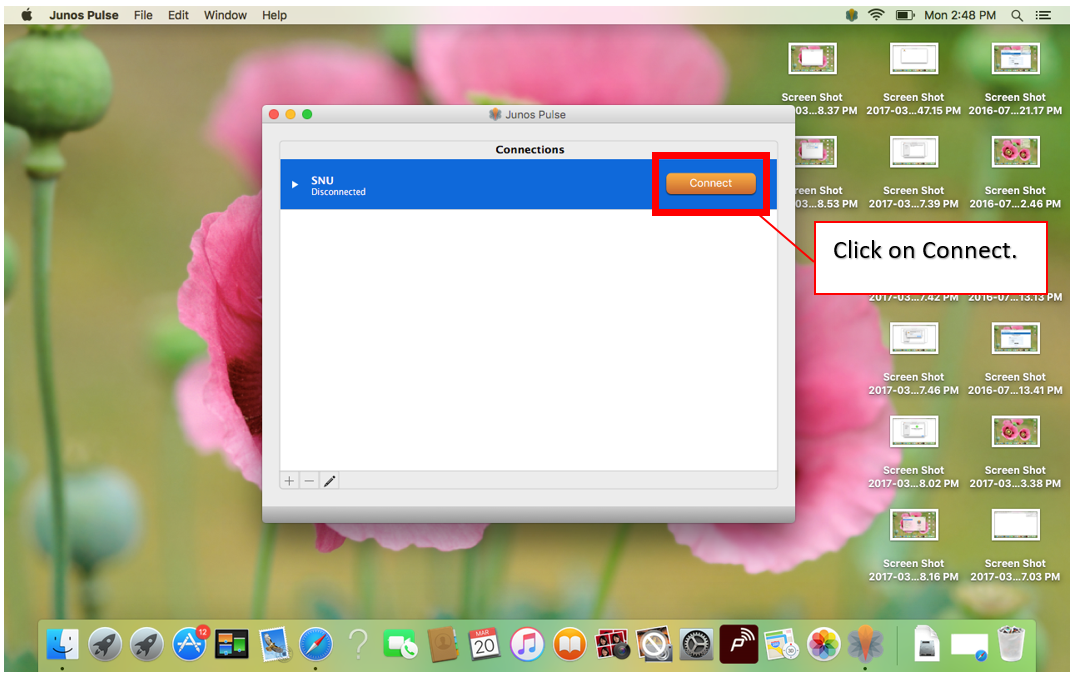
Step11: Establishing VPN Connection
In the Window Below, you will see the newly added connection. Click on Connect.
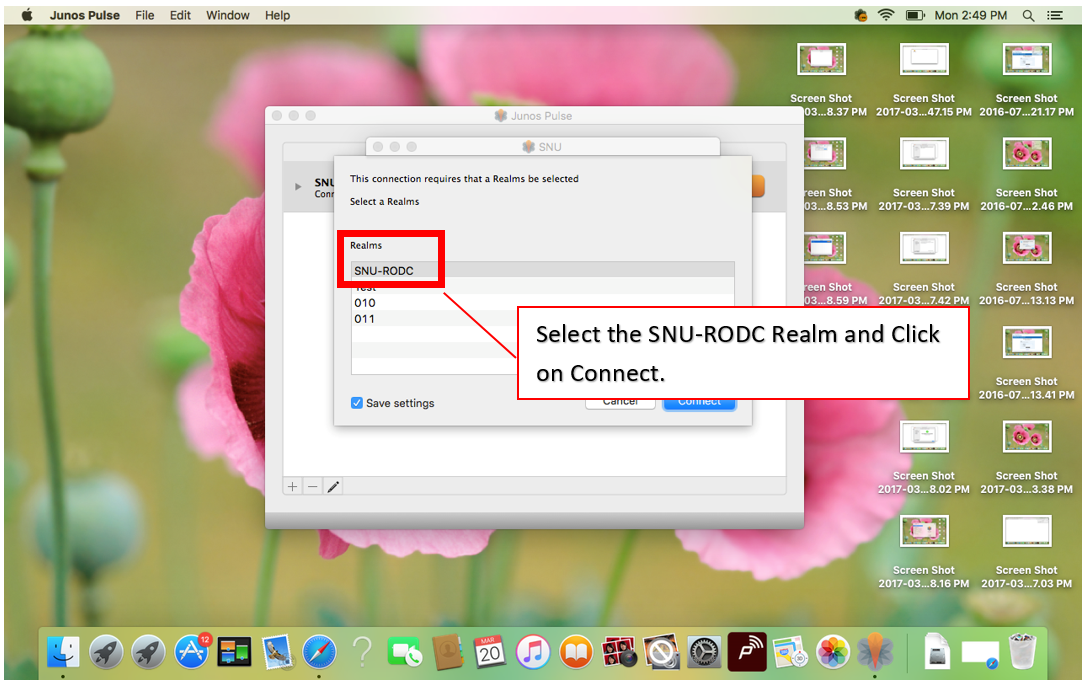
Step12: Selecting Realms
In the Window Below, select the Realms “SNU-RODC”. Click on Connect.
Step13: Disconnecting your Session.
In the Window Below, Enter your VPN User Name and Password. Click on Connect.
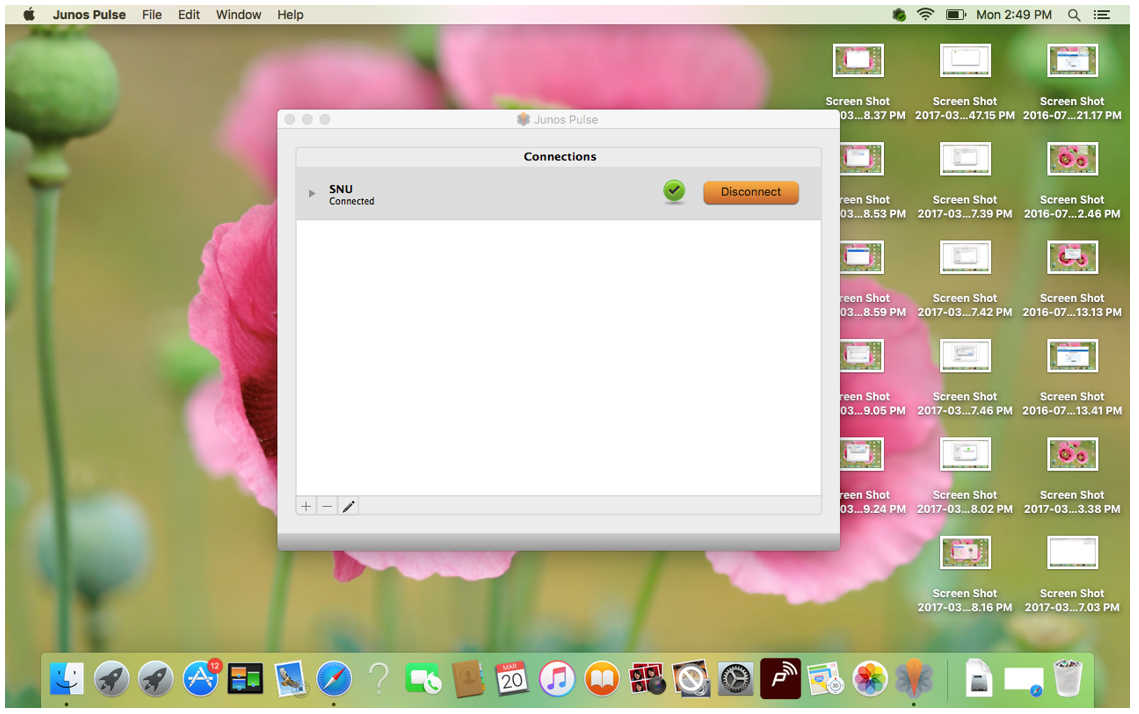
- You are now connected to the SNU VPN.
- To disconnect your session, click on Disconnect Button.
Steps for Setting up the VPN -- WINDOWS OS
Step1: Downloading the Setup File
Download the setup from the link
http://helpdesk.webapps.snu.edu.in/Pulse-Secure_Windows_64bit.msi
Step2: Run the Setup.
Double Click on the Downloaded file to run it.
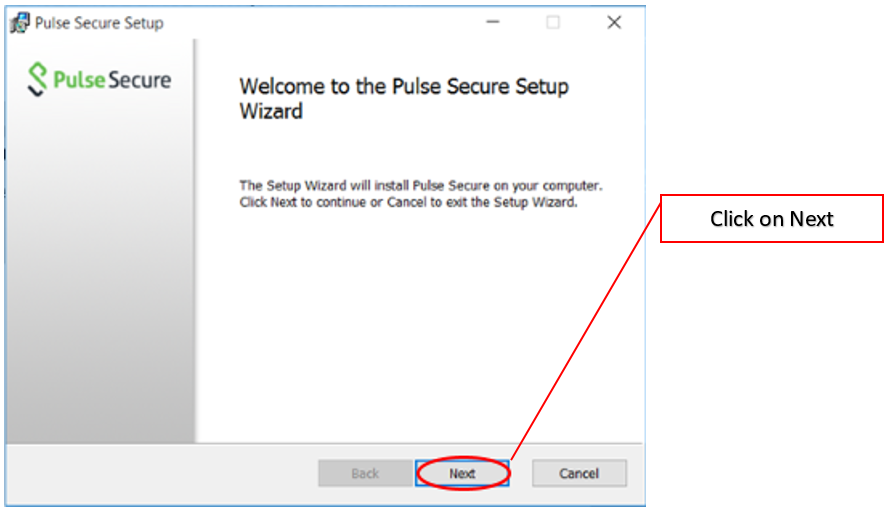
Step3: Install Pulse Secure Software.
Click on Next Button.
Step4: Install Pulse Secure Software Contd...
Click on the Install Button.
Step5: Install Pulse Secure Software Contd...
Click on Finish Button to finish the installation.
Step6: Launch the Application and Add Connection.
1. Launch the application from Start Menu or the Desktop Icon.
2. Click on the + icon to add the connection.
Step7: Adding a New Connection Contd...
- Select “Policy Secure (UAC) or Connect Secure (VPN)."
- Type the desired connection Name e.g. SNU, Office etc.
- Type the Server URL as: https://vpn.snu.edu.in
- Click on Add Button.
Step8: Establishing the VPN Connection
Click on Connect Button.
Step9: Establishing the VPN Connection Contd...
- Select the “SNU-RODC” from the Realm List.
- Click on the Save Settings Box to save the settings.
- Click on the Connect Button
Step10: Enter your VPN Credentials
- Enter you VPN User Name (eg. “john.doe”)
- Enter you VPN Password (Same as your SNU NET ID)
- Click on Save Settings.
- Click on Connect.
Step11: Close the connection window
Click on the Close Button to Close the window and do your work.
Step12: Disconnecting the Session
- From the System Tray, Find and Right Click on the Pulse Secure Icon.
- You can then disconnect the session by choosing your Connection Name and then selection Disconnect from the Drop down menu.