Difference between revisions of "Password reset or recovery of email ID"


Widgets
Widgets<bs-widget-edit>
Vinay Muskan (Talk | contribs) (Created page with "1. Enter the University email ID in the Google Sign-In page by using a web browser (Google Chrome, Mozilla Firefox, Microsoft Edge, Safari). Click “Next,” as shown below:...") |
Vinay Muskan (Talk | contribs) |
||
| (2 intermediate revisions by the same user not shown) | |||
| Line 1: | Line 1: | ||
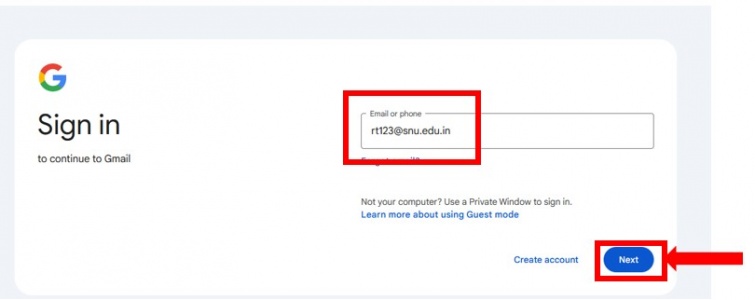
| − | 1. Enter the University email ID in the Google Sign-In page by using a web browser (Google Chrome, Mozilla Firefox, Microsoft Edge, Safari). Click “Next,” as shown below: | + | 1. Enter the University email ID in the Google Sign-In page by using a web browser (Google Chrome, Mozilla Firefox, Microsoft Edge, Safari). Click''' “Next,”''' as shown below: |
| − | + | [[File:2ndpart2.1.jpg|left|border|link=|755x300px]] | |
| − | |||
| − | |||
| − | |||
| − | |||
| − | |||
| − | 8. Click on “Continue to Gmail” after the password setup<br /> <br />(In case, any issue is faced, please write to [email protected] ) | + | |
| + | |||
| + | |||
| + | |||
| + | |||
| + | |||
| + | |||
| + | |||
| + | |||
| + | |||
| + | |||
| + | |||
| + | |||
| + | |||
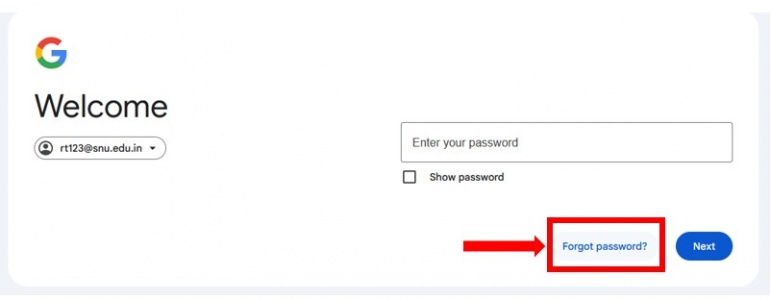
| + | <br />2. Click on''' “Forgot Password”.''' | ||
| + | |||
| + | '''[[File:2ndpart2.2.jpg|left|border|link=|771x300px]]''' | ||
| + | |||
| + | |||
| + | |||
| + | |||
| + | |||
| + | |||
| + | |||
| + | |||
| + | |||
| + | |||
| + | |||
| + | |||
| + | |||
| + | |||
| + | |||
| + | |||
| + | |||
| + | |||
| + | |||
| + | |||
| + | |||
| + | |||
| + | |||
| + | |||
| + | |||
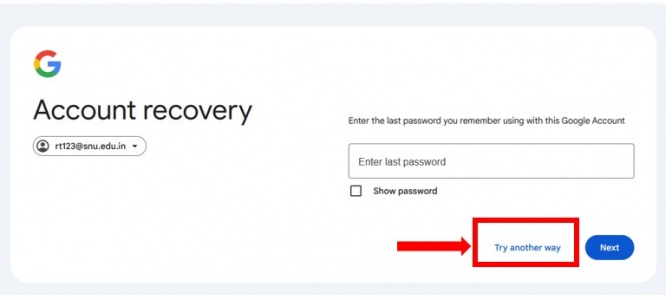
| + | 3. Click on '''“Try Another way”.''' | ||
| + | |||
| + | '''[[File:2ndpart2.3.jpg|left|border|link=|672x300px]]''' | ||
| + | |||
| + | |||
| + | |||
| + | |||
| + | |||
| + | |||
| + | |||
| + | |||
| + | |||
| + | |||
| + | |||
| + | |||
| + | |||
| + | |||
| + | |||
| + | |||
| + | |||
| + | |||
| + | |||
| + | |||
| + | |||
| + | |||
| + | |||
| + | |||
| + | |||
| + | |||
| + | |||
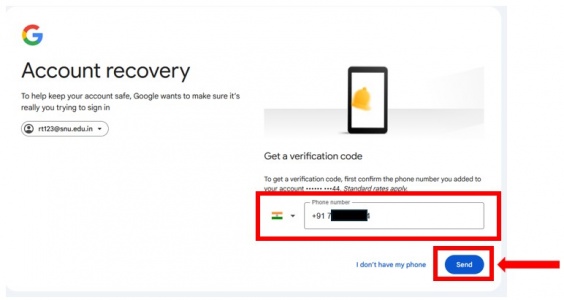
| + | 4. On the next screen, select the country and enter the pre-registered recovery phone number that was set up in Part 1 of this guide. Click on''' “Send”''' button. | ||
| + | |||
| + | [[File:2nd_part2.4.jpg|left|border|link=|564x300px]] | ||
| + | |||
| + | |||
| + | |||
| + | |||
| + | |||
| + | |||
| + | |||
| + | |||
| + | |||
| + | |||
| + | |||
| + | |||
| + | |||
| + | |||
| + | |||
| + | |||
| + | |||
| + | |||
| + | |||
| + | |||
| + | |||
| + | |||
| + | |||
| + | |||
| + | |||
| + | |||
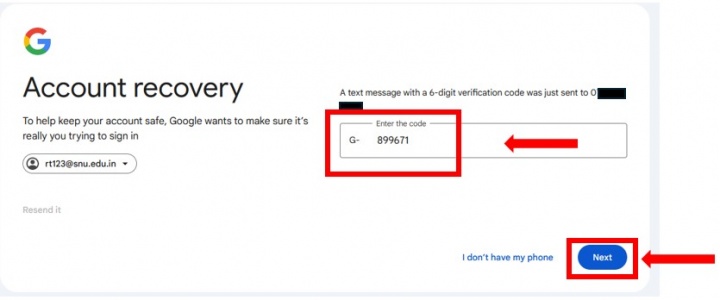
| + | 5. Enter the code received on your phone & click on '''“Next”.''' | ||
| + | |||
| + | '''[[File:2nd_part2.5.jpg|left|border|link=|720x300px]]''' | ||
| + | |||
| + | |||
| + | |||
| + | |||
| + | |||
| + | |||
| + | |||
| + | |||
| + | |||
| + | |||
| + | |||
| + | |||
| + | |||
| + | |||
| + | |||
| + | |||
| + | |||
| + | |||
| + | |||
| + | |||
| + | |||
| + | |||
| + | |||
| + | |||
| + | |||
| + | |||
| + | |||
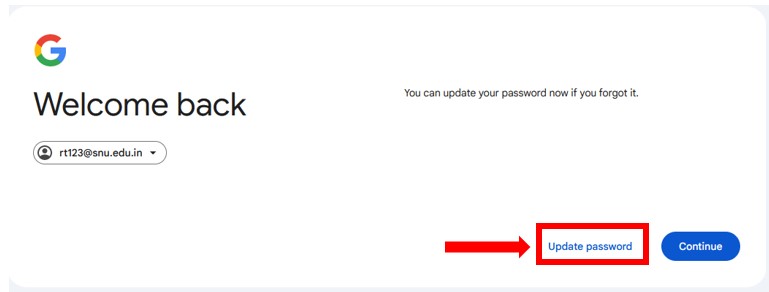
| + | 6. After authentication on the next screen, click on '''“Update Password”.''' | ||
| + | |||
| + | '''[[File:2nd_part2.6.jpg|left|border|link=|790x300px]]''' | ||
| + | |||
| + | |||
| + | |||
| + | |||
| + | |||
| + | |||
| + | |||
| + | |||
| + | |||
| + | |||
| + | |||
| + | |||
| + | |||
| + | |||
| + | |||
| + | |||
| + | |||
| + | |||
| + | |||
| + | |||
| + | |||
| + | |||
| + | |||
| + | |||
| + | |||
| + | |||
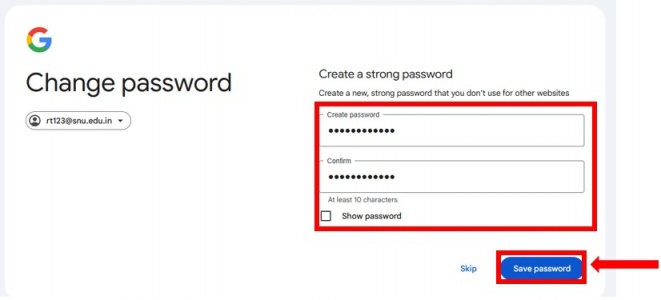
| + | 7. On the next screen, change the password by creating a new password and click on '''“Save Password”.''' | ||
| + | |||
| + | [[File:2nd_part_2.7.jpg|left|border|link=|661x300px]] | ||
| + | |||
| + | |||
| + | |||
| + | |||
| + | |||
| + | |||
| + | |||
| + | |||
| + | |||
| + | |||
| + | |||
| + | |||
| + | |||
| + | |||
| + | |||
| + | |||
| + | |||
| + | |||
| + | |||
| + | |||
| + | |||
| + | |||
| + | |||
| + | |||
| + | |||
| + | |||
| + | |||
| + | |||
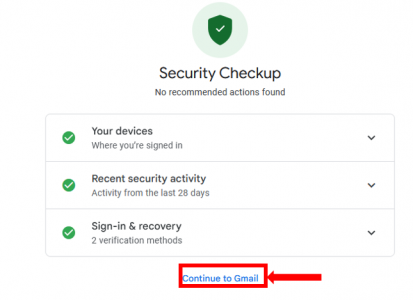
| + | 8. Click on''' “Continue to Gmail”''' after the password setup. | ||
| + | |||
| + | [[File:2ndpart2.8.png|left|border|link=|413x300px]] | ||
| + | |||
| + | |||
| + | |||
| + | |||
| + | |||
| + | |||
| + | |||
| + | |||
| + | |||
| + | |||
| + | |||
| + | |||
| + | |||
| + | |||
| + | |||
| + | |||
| + | |||
| + | |||
| + | |||
| + | |||
| + | |||
| + | |||
| + | <br /> <br /><span style="color: #3366ff;">(In case, any issue is faced, please write to [email protected] )</span> | ||
Latest revision as of 12:55, 21 March 2024
1. Enter the University email ID in the Google Sign-In page by using a web browser (Google Chrome, Mozilla Firefox, Microsoft Edge, Safari). Click “Next,” as shown below:
2. Click on “Forgot Password”.
3. Click on “Try Another way”.
4. On the next screen, select the country and enter the pre-registered recovery phone number that was set up in Part 1 of this guide. Click on “Send” button.
5. Enter the code received on your phone & click on “Next”.
6. After authentication on the next screen, click on “Update Password”.
7. On the next screen, change the password by creating a new password and click on “Save Password”.
8. Click on “Continue to Gmail” after the password setup.
(In case, any issue is faced, please write to [email protected] )