Difference between revisions of "Google Authenticator"


[+/-]
Widgets
Widgets<bs-widget-edit>
From SNUWIKI
Ankit.sharma (Talk | contribs) |
Ankit.sharma (Talk | contribs) |
||
| (4 intermediate revisions by the same user not shown) | |||
| Line 10: | Line 10: | ||
===Step 3: Setup your account=== | ===Step 3: Setup your account=== | ||
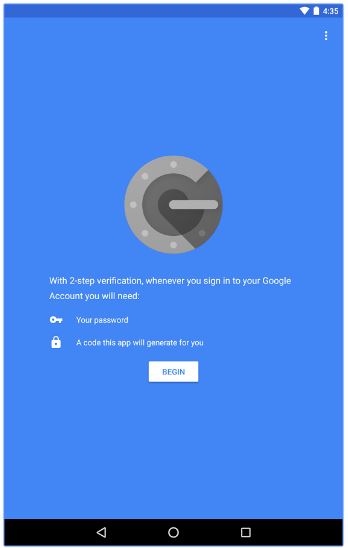
| − | + | * Tap on '''Begin''' | |
[[File:screen1.jpg|none|link=|nolink]] | [[File:screen1.jpg|none|link=|nolink]] | ||
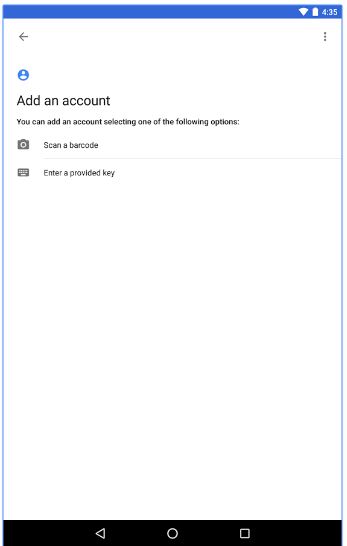
| − | + | * Tap'''"Scan Barcode" '''and then point your camera at the '''QR code''' (''send to you in the email by the Magus Admin Team'') on your computer screen. | |
[[File:screen2.JPG|none|link=|nolink]] | [[File:screen2.JPG|none|link=|nolink]] | ||
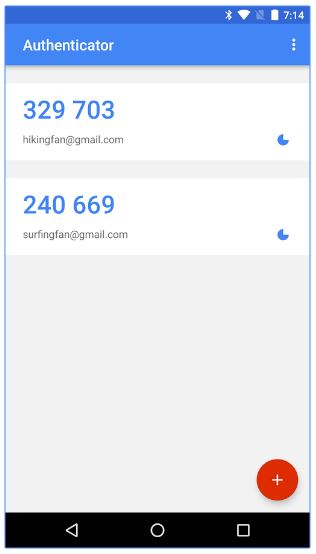
| − | + | * After the scanner scans the '''QR code '''the account will be added to your Google Authenticator App in your smart phone. | |
| − | + | * Verify that the Google Authenticator Application is showing some random numbers like this screen. | |
| − | + | ||
[[File:screen3.JPG|none|link=|nolink]] | [[File:screen3.JPG|none|link=|nolink]] | ||
| Line 53: | Line 52: | ||
===Step 3: Setup your account=== | ===Step 3: Setup your account=== | ||
* <span style="text-decoration: underline;">''Same as that on Android Devices (refer above).''</span> | * <span style="text-decoration: underline;">''Same as that on Android Devices (refer above).''</span> | ||
| + | |||
=Testing your Google Authenticator Code for Login (Currently supports only Login to MAGUS)= | =Testing your Google Authenticator Code for Login (Currently supports only Login to MAGUS)= | ||
==Windows Users== | ==Windows Users== | ||
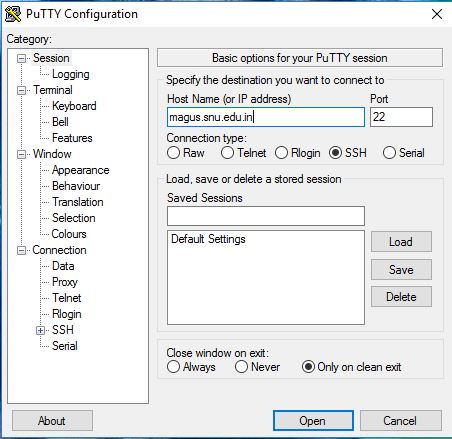
| − | + | * Run the application “'''Putty'''” or any other Terminal Application. | |
| + | * Enter the Host Name as “'''snu.edu.in'''” | ||
| + | * Click on '''Open''' | ||
| + | |||
| + | [[File:putty_screen1.JPG|none|link=|nolink]] | ||
| + | |||
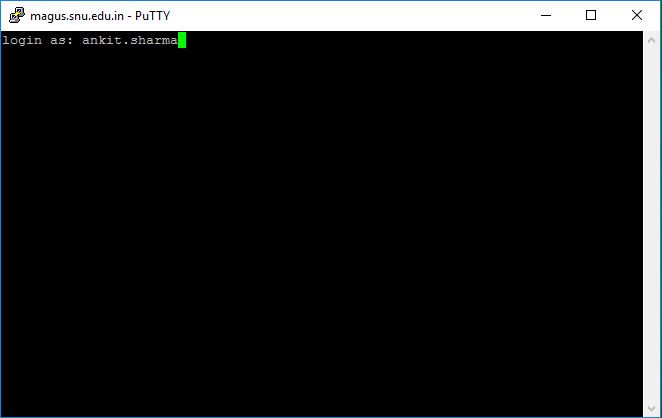
| + | * Enter your '''Username''' | ||
| + | |||
| + | [[File:putty_screen2.JPG|none|link=|nolink]] | ||
| + | |||
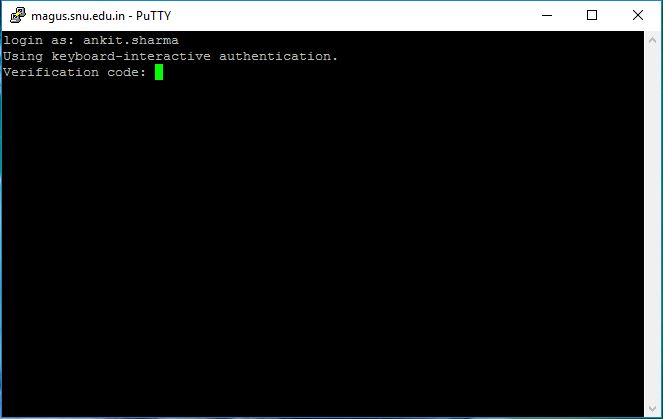
| + | * Enter the '''“Verification Code”''' as displayed in your phone in the '''Google Authenticator''' App | ||
| + | |||
| + | [[File:putty_screen3.JPG|none|link=|nolink]] | ||
| + | |||
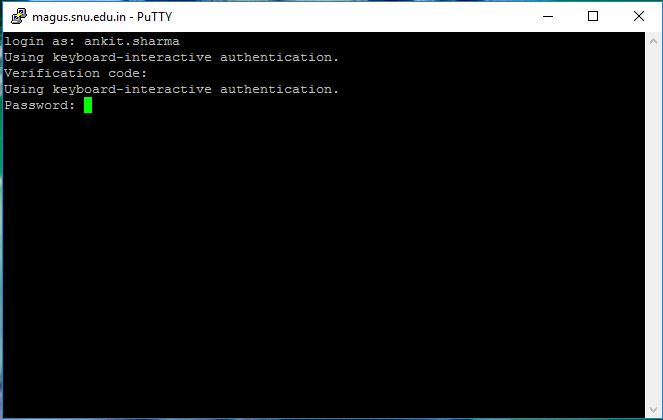
| + | * Enter your '''“Password”''' | ||
| − | + | [[File:putty_screen4.JPG|none|link=|nolink]] | |
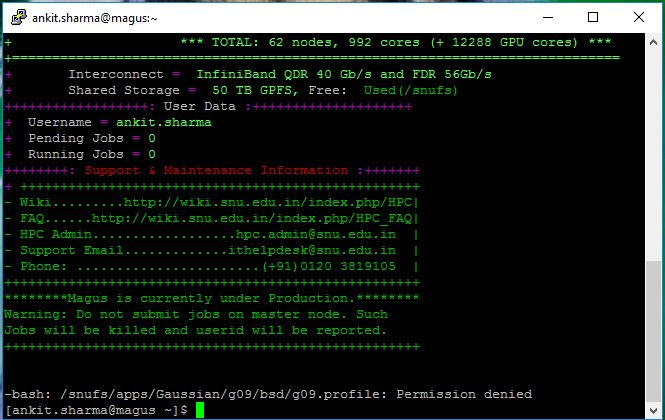
| − | + | * '''You have now logged into Magus Securely and Successfully.''' | |
| − | + | '''[[File:putty_screen5.JPG|none|link=]]''' | |
| − | |||
| − | |||
| − | + | ==Linux Users*== | |
| + | * Open a '''Terminal''' in your Linux Flavour (Ubuntu /Centos /Fedora etc) | ||
| + | * Type the command '''"ssh magus.snu.edu.in"''' | ||
| + | * Enter your '''User Name''' | ||
| + | * Enter the '''“Verification Code”''' as displayed in your phone in the '''Google Authenticator''' App | ||
| + | * Enter your '''"Password"''' | ||
| + | * '''You have now logged into Magus Securely and Successfully.''' | ||
| − | + | ==MAC OS Users#== | |
| + | * Open a '''Terminal''' in your MAC OS. | ||
| + | * Type the command '''"ssh magus.snu.edu.in"''' | ||
| + | * Enter your '''User Name''' | ||
| + | * Enter the '''“Verification Code”''' as displayed in your phone in the '''Google Authenticator''' App | ||
| + | * Enter your '''"Password"''' | ||
| + | * '''You have now logged into Magus Securely and Successfully.''' | ||
| − | |||
| − | |||
| − | + | ''* Screenshots will be updated soon!'' | |
| − | '' | + | ''#Screenshots will be updated soon!'' |
Latest revision as of 11:24, 27 March 2017
Contents
Setup Guide for Google Authenticator
Android OS Phones
Step 1: Downloading and Installing
- Visit the Google Play Store.
- Search for Google Authenticator.
- Download and install the application.
Step 2: Launching Application
- Find the application in the app menu and launch the application.
Step 3: Setup your account
- Tap on Begin
- Tap"Scan Barcode" and then point your camera at the QR code (send to you in the email by the Magus Admin Team) on your computer screen.
- After the scanner scans the QR code the account will be added to your Google Authenticator App in your smart phone.
- Verify that the Google Authenticator Application is showing some random numbers like this screen.
Apple IOS Devices
Step 1: Downloading and Installing
- Visit the App Store.
- Search for Google Authenticator.
- Download and install the application.
Step 2: Launching Application
- Find the application in the app menu and launch the application.
Step 3: Setup your account
- Same as that on Android Devices (refer above).
Blackberry Devices
Step 1: Downloading and Installing
- Open the web browser on your BlackBerry.
- Visit m.google.com/authenticator.
- Download and install the application.
OR
- Open BlackBerry World.
- Search for Google Authenticator.
- Download and install the application.
Step 2: Launching Application
- Find the application in the app menu and launch the application.
Step 3: Setup your account
- Same as that on Android Devices (refer above).
Testing your Google Authenticator Code for Login (Currently supports only Login to MAGUS)
Windows Users
- Run the application “Putty” or any other Terminal Application.
- Enter the Host Name as “snu.edu.in”
- Click on Open
- Enter your Username
- Enter the “Verification Code” as displayed in your phone in the Google Authenticator App
- Enter your “Password”
- You have now logged into Magus Securely and Successfully.
Linux Users*
- Open a Terminal in your Linux Flavour (Ubuntu /Centos /Fedora etc)
- Type the command "ssh magus.snu.edu.in"
- Enter your User Name
- Enter the “Verification Code” as displayed in your phone in the Google Authenticator App
- Enter your "Password"
- You have now logged into Magus Securely and Successfully.
MAC OS Users#
- Open a Terminal in your MAC OS.
- Type the command "ssh magus.snu.edu.in"
- Enter your User Name
- Enter the “Verification Code” as displayed in your phone in the Google Authenticator App
- Enter your "Password"
- You have now logged into Magus Securely and Successfully.
* Screenshots will be updated soon!
#Screenshots will be updated soon!